1. Documentation

Nav3D Home Documentation

1.1 Getting Started

  • All asset classes you need to work with are contained in the Nav3D.API namespace.
  • In the playmode, Nav3D will create several MonoBehaviour objects on the scene that it needs for internal use.

These GameObjects are created with the DontDestroyOnLoad flag. Saving managers when loading another scene can be useful if, for example, you use a separate loading scene in which you initialize Nav3D.

  • Movement of agents (Nav3DAgent) executes inside the FixedUpdate event
  • All time-consuming computational operations are performed on the CPU outside the main thread.
  • All callbacks provided in the Nav3D API are executed in the MainThread.

1.1.1 Nav3DInitializer

To use Nav3D in playmode, you need to initialize it.

The Nav3DInitializer component is designed for this. Create it on the scene using the following top menu button:


The following game object will appear on the scene:

It contains the following settings:

  • Init On Awake – Leave this flag enabled to initialize Nav3D in the playmode on Awake event invocation.
  • Dispose On Destroy – Leave this flag enabled to force Nav3D to clean up all of its internal entities when destroying scene. If disabled, Nav3D and its entities will continue to work when a new scene is loaded.
  • Min Bucket Size – the minimum size of the navigation graph buckets. Must be a positive non-zero number. Here we will explain in a little more detail.Essentially, this parameter allows you to customize the level of detail of the navigation graph. The smaller the parameter value, the higher the detail of the graph.

All game agents that will search for a path using Nav3D have their own size, determined by the radius that you give them when creating. (We will explain this a little later). The minimum cell size must be equal to the maximum radius of the agents, this will guarantee that the agent can go along any path in the graph. If there are agents on the scene whose radius exceeds the minimum bucket size of the navigation graph, then situations are possible when the agents collide obstacles on the stage. Future versions of Nav3D will implement agent size-dependent pathfinding.

*If the Init On Awake and Dispose On Destroy options are disabled, it will be your responsibility to initialize and dispose Nav3D resources. For initialization you will need to call the Nav3DInitializer.Init() method, for disposal – Nav3DInitializer.Utilize(). The value of the Min Bucket Size parameter can also be set via code; to do this, use the MinBucketSize property.

1.1.2 Nav3DManager

Nav3DManager is a helper static class. Can be useful for checking whether Nav3D has initialized and/or performing certain actions on the initialization

There are implemented the following members:

  • A bool Inited property that indicates whether Nav3D has already been initialized.
  • Event event Action OnNav3DInit. It fires immediately after Nav3D is initialized. By subscribing to it you will be able to perform any actions with Nav3D initialization. When you subscribe to an event, your delegate will work instantly, if initialization has already been done previously.
  • Method IsPointInsideOccupiedVolume(Vector3 _Point). Can be useful for determining whether the point is inside of the space occupied by any obstacle.

If you try to use public methods from Nav3D.API namespace before Nav3D is initialized, a Nav3DManagerNotInitializedException will be thrown. Any actions with Nav3D entities may be performed only after its initialization.

1.2 Nav3DObstacle

Nav3D allows you to use game objects in the scene as obstacles with a MeshFilter component with a Mesh assigned, or with a Terrain component.

*For obstacles using MeshFilter, make sure the mesh import settings “Read/Write Enabled” flag is set to true.

Attach the Nav3DObstacle component to a game object that you want to be an obstacle in the scene.

You will see the component inspector:

There are following settings:

  • Selecting an obstacle processing mode (obstacles processing must be performed after Nav3D is initialized, so that obstacles are taken into account when pathfinding performs to agents can avoid them while moving):
    • Runtime – the obstacle will be processed directly during playmode after Nav3D is initialized. This can be useful if an obstacle is generated during playmode.
    • Load from binary – the obstacle will be loaded from a pre-baked binary file. In most cases, the configuration of a game scene is known in advance, even before the scene is loaded and Nav3D is initialized. In such cases, it is always preferable to bake the scene obstacles in editor mode and load them from the binary file at the start of the scene. Loading from a binary file is always much faster than processing an obstacle directly at runtime.
  • Process children – if enabled, then information about the MeshFilter and Terrain components will be collected for all children of the transform hierarchy. And all children who have these components will be taken into account when processing the obstacle.

*If you want any child element of an obstacle containing a MeshFilter or Terrain not to be taken into account when constructing the navigation graph, then attach the Nav3DObstacleIgnoreTag component to it.

  • Auto-update on change – if enabled, then if the position, rotation or scale of the transform component of an obstacle changes, it will cause it to recalculate the obstacle navigation graph. (The obstacle will first be removed from the obstacle store, then re-processed and added to it.)This function is available for use only for obstacles with the selected Runtime processing mode.

*Since adding an obstacle is always a time-consuming process, updating the obstacle too often can have a negative impact on performance. We recommend using this function for small, isolated obstacles.

  • Update min period – how often the obstacle should be updated (in seconds) when the “Update automatically on transform change” option is enabled.

For runtime obstacles, it is possible to remove/re-add them to the storage directly during the playmode. Addition occurs when OnEnable() is invoked, removal occurs when OnDisable() is invoked. Accordingly, any runtime obstacle created on the scene during the playmode will be processed and added to the storage. If you delete or disable an obstacle game object, it will be removed from storage. Re-enabling an obstacle will cause it to be re-added to storage.

1.2.1 Nav3DObstacleLoader

To use the possibility of pre-baking obstacles on the scene in editor mode and then loading them from a binary file, the Nav3DObstacleLoader component is used. You can create it on the scene using the following top menu button:


The following game object will appear on the scene:


For all obstacles in the scene that you want to bake, select the “Load from binary” processing mode.


Next, in the Nav3DObstacleLoader component inspector, you can see a list of all game objects with the Nav3DObstacle component that are subject to baking.


Click the “Bake and serialize obstacles” button and select a folder in the project to save a binary file with baked data about obstacles on the scene.

After successful baking, the Nav3DObstacleLoader component inspector will look like this:


The inspector of successfully serialized Nav3DObstacle will look like this:

Now in game mode, when Nav3D is initialized, the navigation graphs of all baked obstacles on the scene will be loaded from a binary file.

*There is an important note regarding game objects for which static batching is enabled. When loading the navigation graph from a binary file, Nav3DObstacleLoader tries to check the correspondence of the data in the binary file and the current parameters of the obstacle on the scene (the structure of the transform hierarchy, the transform component fields, the presence of a valid mesh in the MeshFilter, and so on). This check is needed to throw an exception and thereby notify the user that the baked navigation file has become obsolete, since the obstacle was changed after saving the binary file. If static batching is enabled for a group of obstacles, validation will never be successful because the obstacle mesh cannot be accessed. So we added the option to disable validation. To do this, uncheck “Validate serialized data” in the Nav3DObstacleLoader inspector.

1.2.2 Deeper dive into obstacles

  • As already described above, in order for an obstacle to be taken into account during pathfinding, you need to attach a Nav3DObstacle component to its game object.
  • Nav3D has an obstacle storage that is used during pathfinding. It stores navigation graphs of obstacles on the scene.
  • All operations with obstacles (adding or removing) are placed in an execution queue and performed sequentially in a separate thread.
  • Obstacle processing means constructing a passability graph (also known as a navigation graph) for each obstacle, or for a group of obstacles, and then adding this graph to the obstacle storage.

Navigation graphs are used during pathfinding on a scene.

The result of processing one obstacle or a group of obstacles can be one or more navigation graphs that do not intersect each other in space.

1.3 Nav3DParticularResolutionRegion

It is possible to define space regions in which a particular minimum bucket size of the navigation graph can be specified.

Let’s imagine a situation where a suitable minimum bucket size of the search graph (resolution) is 1. However, there are several tight areas in your game scene where a resolution of 1 does not give sufficient detail to the navigation graph. In such a situation, you can of course reduce the minimum size of the search graph buckets for the entire space of your scene, but this will lead to an increase in the processing time for obstacles, as well as an increase in the average pathfinding time on the scene.

The best way out in such a situation would be to reduce the size of the buckets only in the area where you want to increase the detail of the search graph.

To do this, we implemented the Nav3DParticularResolutionRegion object, which allows you to specify a region in space in which a specific minimum bucket size of the navigation graph will be used when processing an obstacle.

1.3.1 Nav3DParticularResolutionRegion: Usage

To create graph particular resolution region, use the following top menu button:

Set the required position on the scene for it, then in the inspector of the Nav3DParticularResolutionRegion component, set the region sizes, and also specify the desired minimum size of the navigation graph buckets. To draw the region, turn on Gizmos in the scene window.

Below is a navigation graph for two identical obstacles, one of which is located in a region with a minimum bucket size of the graph = 0.2. The second one is outside the region and the minimum bucket size of the pathfinding graph on the whole scene is set as = 0.4.

The obstacle on the right obviously has a more detailed navigation graph, since it is located in a region with a smaller minimum bucket size.

1.3.2 Nav3DParticularResolutionRegion: Some points

  • The use of the resolution regions is intended to solve problems related to the insufficiency of the graph detailing in tight areas of space, such as, for example, narrow tunnels, small holes through which it must be possible to find a path. But also in such regions, you can set the size of the minimum bucket larger than the bucket size set on the entire scene. This can be useful when, on the contrary, you want to avoid over-detailing the search graph for some obstacles. Avoiding excessively high resolution of the navigation graph will have a beneficial effect on overall pathfinding performance.
  • An octree is a hierarchical structure in which the sizes of all buckets are always a multiple of each other and from level to level the size changes with a multiplier of two (each next level contains buckets two times smaller than the previous one). So you can only specify the desired minimum bucket size. In fact, the actual minimum bucket size will be calculated relative to the size specified during Nav3D initialization. If, for example, at initialization, the minimum size was specified as 0.4, and you specify the desired minimum size as 0.3, then the size 0.2 will actually be chosen, since it should be a level lower and obtained from 0.4 divided by 2. If you choose the desired size as 0.7, then the actual size will be 0.8 since it must be a level higher and is multiplied by 2. The desired value of 0.9 becomes the actual value of 1.6. And so on.
  • If the obstacle is located inside the intersection of several regions with different minimum bucket sizes, the smallest value from the region values will be selected as the minimum bucket size during processing.
  • We recommend using regions as static objects that are on the scene when all obstacles are processed. The operation of adding/removing a region during runtime will entail re-processing those runtime obstacles that are intersected by the region. Static obstacles will not react in any way to removing/adding a region.Initialization and deinitialization of a region occurs through the OnEnable() and, accordingly, DoDisable() events in Nav3DParticularResolutionRegion. So to initialize a region, you can create its prefab on the stage, to deinitialize it, you can make its GameObject inactive, or destroy it

1.4 Nav3DPath

The Nav3DPath class is designed to perform pathfinding in scene space.

In general, objects of this type are used by agents (Nav3DAgent) when performing a path search. But you can also use it separately for your own purposes.

Of course, working with Path objects is only possible after Nav3D has been initialized. Read more in “Nav3DInitializer” section.

1.4.1 Nav3DPathfindingManager

This class contains few properties to manage pathfinding tasks limitations..

To achieve the required level of performance when using Nav3D, the following properties can be useful:

  • public static int CurrentPathfindingTasksCount – shows how many parallel pathfinding tasks are currently active;
  • public static int MaxPathfindingTasks – allows you to limit a number of pathfinding tasks running simultaneously. By default, this property is set to Environment.ProcessorCount - 1

1.4.2 Nav3DPath: Pathfinding

To perform pathfinding you need to do: 

  1. Create a Nav3DPath instance using constructor new Nav3DPath().
  2. Call one of the following methods:

To search a path between 2 points:

				
					public void Find(
Vector3 _Start,
Vector3 _End,
Action _OnSuccess = null,
Action<PathfindingError> _OnFail = null
)


Parameters meaning:

  • Action _OnSuccess – successful pathfinding completion callback.
  • Action<PathfindingError> _OnFail – pathfinding fail callback, contains some info about error.

To search a path between more than 2 points:

				
					public void Find(
       Vector3[] _Targets,
       bool _Loop,
       bool _SkipUnpassableTargets = false,
       Action _OnSuccess = null,
       Action<PathfindingError> _OnFail = null
   )


Parameters meaning:

  • bool  _Loop – whether need  to loop the path (if true then the end and start points will be connected by path as well).
  • bool  _SkipUnpassableTargets – whether skip any point pathfinding to which was failed. If true, then the failure to find a path between any pair of points will lead to pathfinding abort and _OnFail callback to be invoked.

It is possible to repeat the last pathfinding procedure. It can be useful in case when the scene configuration has changed and the last found path is no longer relevant.

To do this, call the public void Update() method.

1.4.3 Nav3DPath: Properties

  • public bool IsValid { get; } – indicates whether the last pathfinding performed was successful. The value becomes false if the value of any Smooth or SmoothRatio property has changed.
  • public bool IsPathfindingInProgress { get; } – whether pathfinding currently in progress.
  • public Vector3[] Trajectory { get; } – the last found path trajectory. Use the IsValid property to ensure that the value is relevant.
  • public Bounds Bounds { get; } – the volume of the space that is occupied by the found path.
  • public bool Smooth { get; set; } – whether need to smooth the path when pathfinding.
  • public int SmoothRatio { get; set; } – a count of smoothing samples per min. search graph bucket. By default it is set to 3. It is not recommended to increase this value unnecessarily, as this will increase the time spent on pathfinding.
  • public int Timeout { get; set; } – the limit for the pathfinding duration. If the pathfinding takes longer, the Action<PathfindingError> _OnFail callback will be invoked.
  • public bool TryRepositionStartIfOccupied { get; set; } – if true, then in case if the start pathfinding point is inside of the bucket occupied by any obstacle, try to search a path from any free neighbor bucket.
  • public bool TryRepositionTargetIfOccupied  { get; set; } – if true, then in case if the target pathfinding point is inside of the bucket occupied by any obstacle, try to search a path to any free neighbor bucket.
  • public PathfindingResult { get; } – the result of the last successful pathfinding.

1.4.4 Nav3DPath: Events

For the convenience of notification when the pathfinding finished, the following events have been implemented:

  • public event Action OnPathfindingSuccess – triggers when pathfinding finished successfully.
  • public event Action<PathfindingError> OnPathfindingFail – triggers when pathfinding ends with failure.
  • public event Action OnPathfindingComplete – triggers in both cases.

1.4.5 Nav3DPath: Dispose

You have to call the Nav3DPath.Dispose() method when working with the Nav3DPath instance is completed. This is quite important because each initialized path takes some computational resources to track intersection with newly added obstacles. So in order to unsubscribe from obstacles storage updating you need to call Dispose().

1.4.6 PathfindingError

Contains error info in case of _OnFail callback invocation.

Contains two properties:

  • public PathfindingResultCode Reason – the reason why the pathfinding failed.
    Possible values:
ValueDescription
SUCCEEDEDPathfinding finished successfully.
PATH_DOES_NOT_EXISTThere is no path between points. This is possible if at least one of the neighborhood points is surrounded by all sides.
TIMEOUTThe pathfinding took longer than allowed and was aborted.
CANCELEDPathfinding was canceled by the user or Nav3D internal logic.
START_POINT_INSIDE_OBSTACLEPathfinding has been canceled because the start point of the path is inside an obstacle.
TARGET_POINT_INSIDE_OBSTACLEPathfinding has been canceled because the target point of the path is inside an obstacle.
UNKNOWNInternal error.
  • public string Msg – message with more detailed information about the error.

1.4.7 PathfindingResult

Contains the pathfinding data and time statistics.

Time statistics:

    • public TimeSpan PathfindingDuration { get; } – duration of the pathfinding algorithm execution (A*).
    • public TimeSpan OptimizingDuration  { get; } – duration of the optimization algorithm execution.
    • public TimeSpan SmoothingDuration   { get; } – duration of the smoothing algorithm execution.

Pathfinding data:

    • public Vector3[] RawPath { get; } – the source path obtained as the result of A* execution.
    • public Vector3[] PathOptimized { get; } – the path obtained after optimization algorithm execution.
    • public Vector3[] PathSmoothed  { get; } – the path obtained after smoothing algorithm execution. If Smooth = false, then the value will be equal to PathOptimized.
    • public int[] TargetIndices { get; } – the indices of the target points in the PathSmoothed array. The target points mean the points used when calling Nav3DPath.Find().
    • public PathfindingResultCode Result { get; } – pathfinding result code.

1.4.8 Usage example

Below presented an example of how to search for a path from A to B using Nav3DPath.

				
					using Nav3D.API;
using System;
using System.Linq;
using UnityEngine;

class YourGameScenario : MonoBehaviour
{
   #region Attributes

   Vector3[] m_FoundPath;

   #endregion
  
   #region Unity events

   void Start()
   {
       Nav3DManager.OnNav3DInit += () =>
       {
           Vector3 a = new Vector3(-10, -10, -10);
           Vector3 b = new Vector3(10, 10, 10);

           FindPath(a, b, PrintPath);
       };
   }

   void OnDrawGizmos()
   {
       if (!Application.isPlaying || !enabled)
           return;

       if (m_FoundPath != null && m_FoundPath.Any())
       {
           for (int i = 0; i < m_FoundPath.Length - 1; i++)
               Gizmos.DrawLine(m_FoundPath[i], m_FoundPath[i + 1]);
       }
   }
  
   #endregion

   #region Service methods

   //your method for pathfinding from A to B
   void FindPath(Vector3 _A, Vector3 _B, Action<Vector3[]> _OnPathFound)
   {
       //create Nav3DPathPath instance
       Nav3DPath path = new Nav3DPath(gameObject.name);

       //perform pathfinding from _A to _B
       path.Find(
               _A,
               _B,
               _OnSuccess: () =>
               {
                   //notify that path was found
                   Debug.Log("Path successfully found!");

                   //invoke callback
                   _OnPathFound(path.Trajectory);

                   //finish work with Nav3DPath instance
                   path.Dispose();
               }
           );
   }

   void PrintPath(Vector3[] _Path)
   {
       m_FoundPath = _Path;

       Debug.Log($"Path points: {string.Join(", ", m_FoundPath)}");
   }

   #endregion
}


1.4.9 Nav3DPathTester

We implemented a useful component (Nav3DPathTester), which can be used while building a scene to check how exactly the path passes in different areas.

  • To use it, you should attach the Nav3DPathTester component to any game object in the scene.
  • Use of the Nav3DPathTester is only possible in play mode.

After attaching the component you’ll see its inspector:

The purpose of all parameters is the same as the Nav3DPath.Find() parameters.

Add some game objects that you want to use as pathfinding target points. Then add these objects to the Targets list in the Nav3DPathTester inspector.

In play mode, with Gizmos enabled, you can see how the path passes through the target points.

Below are two examples of pathfinding for the case of three target points, with the Loop option enabled and disabled.

1.5 Nav3DAgent

The Nav3DAgent is the main class responsible for the game agents movement in the scene space.

  1. Nav3DAgent public methods can only be used after Nav3D has been initialized. Read more in the Nav3DInitializer section.
  2. Use this class as the component for your game units.
  3. To use Nav3DAgent properly, you need to configure its parameters. There are many parameters for many behavior properties. Therefore, they are stored in a separate container class called Nav3DAgentConfig.

1.5.1 Nav3DAgentManager

This class implements several methods to get a list of all Nav3DAgents located inside a certain area of ​​the scene:

  • public static Nav3DAgent[] GetAgentsInBounds(Bounds _Bounds) – returns the list of all Nav3DAgents located inside a certain Bounds.
  • public static Nav3DAgent[] GetAgentsInSphere(Vector3 _Center, float _Radius) – returns a list of all Nav3DAgents located inside a sphere with center at _Center and radius of _Radius.

1.5.2 Nav3DAgentConfig

Nav3DAgentConfig serves as a parameters storage of the agent and allows you to customize its behavior and all necessary settings.

You can create an instance of it through the context menu of the Project tab.

After creating a config instance, in its inspector you will see the following list of parameter groups:

Here is an explanation of the purpose of the parameters and their allowable values.

Behavior

Option Property name in Nav3DAgentConfig Type Value range
Motion Navigation Type
MotionNavigationType
enum MotionNavigationType
COMBINED, GLOBAL, LOCAL

The main purpose of all agents is to move towards some target in space, be it another agent or a point in space. Agents can move using three ways of orientation in space:

  • Using the global path (GLOBAL). In this case, the agent will search for a path and will move along it, regardless of external conditions (other agents or edges of obstacles that are too close).
  • Using only local avoidance (LOCAL). The agent will not use pathfinding for movement, but will move towards the target in a straight line, dodging other agents and obstacles along the way when they meet on the course of movement. Of course, not every obstacle can be overcome in this way.
  • Finally, the agent can move towards the target using pathfinding and local avoidance at the same time (COMBINED). The agent will move along the found path and avoid other agents that come close, as well as obstacles that are too close.

Radius

Option Property name in Nav3DAgentConfig Type Value range
Radius
Radius
float
>0

The range of the agent is used to perform local evasion maneuvers. Establishing the correct radius is important for effective local traversal by both the agent itself and other agents nearby. We advise you to adjust the radius so that all the visual content of the game unit, which is the agent, is inside the sphere of the specified radius.

Speed

Option Property name in Nav3DAgentConfig Type Value range
Speed
Speed
float
>0

The agent’s speed. You can change it at any time if needed.

Option Property name in Nav3DAgentConfig Type Value range
Max Speed
Max Speed
float
>Speed

The maximum speed of the agent. This parameter is required to perform a local crawl. In some situations, the agent may need to speed up to avoid a collision. If the value is set too high, the agent may sometimes move jerkily when performing a local crawl. Therefore, we advise you to set the maximum speed a little more than Speed (less than one and a half times more).

For your convenience, there are two ways to set this value in the inspector. With a certain value. Or using a multiplier to increase the speed. We recommend using a multiplier so that the maximum speed depends on the agent’s speed. Then the maximum speed will change following the speed change at any time.

Local avoidance

Option Property name in Nav3DAgentConfig Type Value range
Agents considered number limit
bool
true, false

Allows you to limit the number of nearby agents considered for local crawling.
Enabling this option makes sense if you use a large number of agents in a limited space. In such a situation, each agent may have many neighbors, and performance may not be sufficient to ensure high fps if all nearby agents are taken into account in the calculations.

Option Property name in Nav3DAgentConfig Type Value range
Agents number
ConsideredAgentsNumberLimit
int
>=1

The number of agents that are taken into account from all nearby agents.

Option Property name in Nav3DAgentConfig Type Value range
Avoid static obstacles
AvoidStaticObstacles
bool
true, false

Whether to perform local avoidance for static obstacles.

There may be situations when an agent can get close to a static obstacle, for example by avoiding other agents or if its path is close to the obstacle.

It is not recommended to enable this option unless it is really necessary, as it affects performance.

Option Property name in Nav3DAgentConfig Type Value range
ORCA Tau
ORCATau
float
>0

The time range for calculating the velocity obstacle (VO). We do not recommend changing this parameter.

To better understand its meaning, the original article about ORCA: Reciprocal n-body Collision Avoidance. Jur van den Berg, Stephen J. Guy, Ming Lin, and Dinesh Manocha

Pathfinding

Option Property name in Nav3DAgentConfig Type Value range
Pathfinding timeout (ms)
PathfindingTimeout
int
>0

Maximum path search time. If the path search takes longer, the Action _OnFail callback will be executed if it was passed to UpdatePath().

Option Property name in Nav3DAgentConfig Type Value range
Smooth the path
SmoothPath
bool
true, false

Whether it is necessary to smooth the found path.

Option Property name in Nav3DAgentConfig Type Value range
Samples per min bucket volume
SmoothRatio
int
>0

The number of path segments per minimum octree cell size resulting from smoothing the original path. You should not excessively increase this parameter, as this increases the total pathfinding time..

Option Property name in Nav3DAgentConfig Type Value range
Auto-update path on stagnant behavior
AutoUpdatePath
bool
true, false

When using the local avoidance mechanism in combination with global pathfinding, a situation may arise when the path passes through an area of space where many other agents are present. Then our agent can deviate from the path found, trying to avoid collisions with other agents. This process can continue indefinitely, because, trying to return to the original trajectory, the agent will always deviate from it again, meeting with other agents.

Enable this option to automatically replace the path. Then, if the agent has moved away from its path far enough and is at a sufficiently large distance, the path will be found again from the agent’s current position.

Option Property name in Nav3DAgentConfig Type Value range
Auto-update cooldown (ms)
PathAutoUpdateCooldown
int
>=1

Minimum path auto-update period. If the area of space is too full of other agents, then path recalculation may be too frequent, which will negatively affect performance in case of a large number of agents in the scene. We recommend limiting the frequency of auto correction to a few seconds.

Option Property name in Nav3DAgentConfig Type Value range
Try reposition target if occupied
TryRepositionTargetIfOccupied
bool
true, false

Enabling this option allows attempting to perform pathfinding to an adjacent free bucket if the target point is located in a bucket occupied by an obstacle.

If the parameter is disabled then pathfinding will be cancelled and the GOAL_POINT_INSIDE_OBSTACLE error will be returned.

Motion

Option Property name in Nav3DAgentConfig Type Value range
Target reach distance
TargetReachDistance
float
>=0

The distance required to reach the goal. When you order an agent to reach a goal, the goal will be considered reached when the agent’s pivot point coincides with the goal coordinate (the distance between them will be 0). This can be inconvenient if the target is a hooked object, say, a planet in space. In this case, set this parameter equal to the sum of the radius of the visible part of the agent and the radius of the planet. Then the agent will stop when it reaches the surface of the planet.

Option Property name in Nav3DAgentConfig Type Value range
Max rotation in degrees per fixed update tick
MaxAgentDegreesRotationPerTick
float
>=0

The maximum number of degrees that the agent can rotate when performing a rotation in the direction of movement.
During the movement, the agent turns towards the velocity vector. If the velocity vector changes dramatically during movement, then the agent’s turn may look sharp. To make it smoother, set this parameter not too high.

Option Property name in Nav3DAgentConfig Type Value range
Rotation vector lerp factor
RotationVectorLerpFactor
float
(0 - 1)

In order to make the rotation of an agent even more smoother, when computing the rotation vector the frame rotation vector and the value of rotation vector for a few last frames are used.

Decreasing the parameter makes the rotation smoother, increasing it makes it sharper.

Velocity blending

When using global pathfinding and local avoidance, the agent moves using three velocity vectors:

  1. The velocity vector along the path.
  2. The velocity vector of avoidance from nearest agents.
  3. Obstacle avoidance velocity vector.

The agent blends these three velocities in different proportions and uses the resulting vector for movement. In order to tell the agent in what proportion to mix the speeds, we have introduced weights, the values ​​of which you can adjust.

Not all three velocities can be blended in all situations. For example, there may be no obstacles near the agent, then only the velocity of following the path and the velocity of the nearest agents avoidance will be mixed.

This way you can tell the agent how significant each rate should be when getting the resulting one. If it is preferable to follow the path, then the first weight can be made much larger than the last two. If it is imperative to perform local evasion maneuvers, then the weight of the velocity along the trajectory should be made much smaller than the weight of the evasion speeds.

Below are explanations of the weight parameters. Note that separate parameters are used for each situation.

All weights are floating and must be greater than 0.

The corresponding property names in Nav3DAgentConfig are:

  • PathVelocityWeight
  • PathVelocityWeight1
  • PathVelocityWeight2
  • AgentsAvoidanceVelocityWeight
  • AgentsAvoidanceVelocityWeight1
  • AgentsAvoidanceVelocityWeight2
  • ObstacleAvoidanceVelocityWeight
  • ObstacleAvoidanceVelocityWeight1
  • ObstacleAvoidanceVelocityWeight2

Debug

Option Property name in Nav3DAgentConfig Type Value range
Use log
UseLog
bool
true, false

Whether it is necessary to log agent work processes.

Option Property name in Nav3DAgentConfig Type Value range
Log records count
LogSize
int
>0

Agent log size.

1.5.3 Nav3DAgent: Methods

As mentioned above, you should use the Nav3DAgent script as a component for your game object and access it via GetComponent() .

The following public methods have been implemented to operate with Nav3DAgent:

  • Applies the description for your agent.
				
					public void SetConfig(Nav3DAgentConfig _Config)
				
			
  • Begins agent movement to the target point.
				
					public void MoveTo(
Vector3                  _Point,
Action                   _OnReach           = null,
Action<PathfindingError> _OnPathfindingFail = null,
float?                   _ReachDistance     = null)


Parameters:

    • Vector3 _Point – target point.
    • Action _OnReach – a callback that invokes on target point has reached.
    • Action<PathfindingError> _OnPathfindingFail – pathfinding failure callback.
    • float? _ReachDistance – target point reach distance.
  • Starts agent movement through the set of points. Pathfinding performs sequentially from each point to the next one, therefore the resulting path passes through all given goal points
				
					public void MoveToPoints(
Vector3[]                _Points,
bool                     _Loop                  = false,
bool                     _StartFromClosest      = false,
bool                     _SkipUnpassableTargets = false,
float?                   _ReachDistance         = null,
Action<Vector3>  _OnTargetPointPassed           = null,
Action                   _OnFinished            = null,
Action<PathfindingError> _OnPathfindingFail     = null)


Parameters:

  • Vector3[] _Points – a target points.
  • bool _Loop – whether loop movement through the points. If true, then the agent will move through the points infinitely, going to the first one every time he reaches the last one.
  • bool_StartFromClosest – whether to start movement from the nearest point, and not from the first one.
  • bool_SkipUnpassableTargets – whether any point to which pathfinding was failed will be skipped. If option is disabled, the pathfinding failure for any pair of points will cause pathfinding to be aborted and _OnFail callback to be invoked.
  • float? _ReachDistance – distance to reach any target point.
  • Action<Vector3> _OnTargetPointPassed – a callback that invokes when any of the target points are passed.
  • Action _OnFinished – a callback that invokes when the last target is reached. This callback will never invoke if _Loop = true.
  • Action<PathfindingError> _OnPathfindingFail – pathfinding failure callback.
  • Starts the following of the transform movable target.

				
					public void FollowTarget(
Transform                _Target,
bool                     _FollowContinuously,
float                    _TargetOffsetUpdate,
float                    _TargetReachDistance   = 0,
Action                   _OnReach               = null,
Action                   _OnFail                = null,
Action<PathfindingError> _OnPathfindingFail     = null)


Parameters:

    • Transform _Target – a target transform to follow.
    • bool _FollowContinuously – whether to follow the target infinitely. If true, the agent will never finish following and never call _OnReach. When the target is reached the agent will merely wait until it continues the movement.
    • float _TargetOffsetUpdate – minimum target position delta that causes path re-search.
    • float _TargetReachDistance – distance to target transform required to finish following and invoke _OnReach.
    • Action _OnReach – on target reach callback.
    • Action _OnFail – callback that invokes if the target was destroyed or switched to inactive condition at the scene.
    • Action<PathfindingError> _OnPathfindingFail – pathfinding failure callback.
  • Stops any previous command (MoveTo, MoveToPoints, FollowTarget).
				
					public void Stop()
				
			
  • Returns agents array within radius _Radius that satisfy the given predicate _Predicate.
				
					public Nav3DAgent[] GetAgentsInRadius(float _Radius, Predicate<Nav3DAgent> _Predicate = null)


Examples of using Nav3DAgent can be found in the demo scenes located in Nav3D/Demo.

1.5.4 Nav3DAgent: Debug

The Nav3DAgent has an inspector that provides several useful functions to help with debugging and give a better understanding of the interaction of objects in the game scene.

1.5.5 Nav3DEvader

There is also a separate controller, whose behavior consists of just avoiding nearest agents and static obstacles, if they collide with it.

Its behavior looks quite interesting. The demo can be found in the Nav3D/Demo/EvadersCrowd folder.

Its inspector has following settings:

  • Radius – the radius for which collisions with other entities are checked.
  • Max Speed – the max. allowed speed for performing avoidance.
  • Speed Decay Factor – the speed decay factor after completing the avoidance maneuver. The higher the value, the faster Nav3DEvader will stop after avoiding a collision. The valid range of the value is (0-1).

1.5.6 Nav3DSphereShell

Represents a spherical shell that is perceived by other agents as an object to avoid. Nav3DSphereShell can be moved externally. Nav3DAgents and Nav3DEvaders will avoid collisions with it.

The behavior of Nav3DSphereShell is shown in the demo Nav3D/Demo/SphereShellDemo.

You can adjust the radius of the sphere in the Nav3DSphereShell inspector:

2. Nav3DInitializer

To use Nav3D in playmode, you need to initialize it.

The Nav3DInitializer component is designed for this. Create it on the scene using the following top menu button:


The following game object will appear on the scene:

It contains the following settings:

  • Init On Awake – Leave this flag enabled to initialize Nav3D in the playmode on Awake event invocation.
  • Dispose On Destroy – Leave this flag enabled to force Nav3D to clean up all of its internal entities when destroying scene. If disabled, Nav3D and its entities will continue to work when a new scene is loaded.
  • Min Bucket Size – the minimum size of the navigation graph buckets. Must be a positive non-zero number. Here we will explain in a little more detail.Essentially, this parameter allows you to customize the level of detail of the navigation graph. The smaller the parameter value, the higher the detail of the graph.

All game agents that will search for a path using Nav3D have their own size, determined by the radius that you give them when creating. (We will explain this a little later). The minimum cell size must be equal to the maximum radius of the agents, this will guarantee that the agent can go along any path in the graph. If there are agents on the scene whose radius exceeds the minimum bucket size of the navigation graph, then situations are possible when the agents collide obstacles on the stage. Future versions of Nav3D will implement agent size-dependent pathfinding.

*If the Init On Awake and Dispose On Destroy options are disabled, it will be your responsibility to initialize and dispose Nav3D resources. For initialization you will need to call the Nav3DInitializer.Init() method, for disposal – Nav3DInitializer.Utilize(). The value of the Min Bucket Size parameter can also be set via code; to do this, use the MinBucketSize property.

3. Operations with obstacles

Regardless of the obstacle processing mode, the processing procedure consists of several stages:

  1. Collecting information about the geometry of the obstacle for each Nav3DObstacle.

    At this stage, a list of all geometries that form an obstacle is obtained, then they are combined (clustered).

    Let’s say there are several children in the transform hierarchy of the obstacle, each of which has a MeshFilter with a Mesh assigned. Accordingly, in this case, several lists of triangles that make up the meshes will be obtained. Next, for each list of triangles, the enclosing volume will be defined in the form of Bounds. Those lists whose Bounds intersect will be merged. We will call each such individual list an “obstacle volume.” The result is one or more obstacle volumes. This will be done for every Nav3DObstacle processed in the scene.

  2. Clustering with already processed obstacles.

    It is checked whether the volumes of the newly procсessing obstacle intersect with the volumes of obstacles already in the storage. If yes, then clustering occurs with obstacles already added. The result is a new list of obstacle volumes.

  3. Removing obsolete volumes of stored obstacles from storage.

    Those volumes that intersected with the volumes of the newly processing obstacle and that were included in the new (clustered) volumes are considered obsolete.

  4. Next, navigation graphs are constructed for new volumes.

    These volumes are then added to the obstacle storage.

Removing an obstacle from a storage consists of the following steps:

  1. From the storage, a list of all volumes containing triangles of the obstacle being removed is obtained (each volume can contain triangles of several obstacles).
  2. For each volume, the triangles of the obstacle to be removed are removed from the resulting list.
  3. Further, only volumes in which triangles still remain after removal are considered. For these volumes, the embracing Bounds are recalculated.
  4. All volumes from the original list are removed from the obstacle storage.
  5. All remaining volumes with recalculated Bounds are clustered and added back to the obstacle storage.

4. Getting Started

  • All asset classes you need to work with are contained in the Nav3D.API namespace.
  • In the playmode, Nav3D will create several MonoBehaviour objects on the scene that it needs for internal use.

These GameObjects are created with the DontDestroyOnLoad flag. Saving managers when loading another scene can be useful if, for example, you use a separate loading scene in which you initialize Nav3D.

  • Movement of agents (Nav3DAgent) executes inside the FixedUpdate event
  • All time-consuming computational operations are performed on the CPU outside the main thread.
  • All callbacks provided in the Nav3D API are executed in the MainThread.

4.1 Nav3DInitializer

To use Nav3D in playmode, you need to initialize it.

The Nav3DInitializer component is designed for this. Create it on the scene using the following top menu button:


The following game object will appear on the scene:

It contains the following settings:

  • Init On Awake – Leave this flag enabled to initialize Nav3D in the playmode on Awake event invocation.
  • Dispose On Destroy – Leave this flag enabled to force Nav3D to clean up all of its internal entities when destroying scene. If disabled, Nav3D and its entities will continue to work when a new scene is loaded.
  • Min Bucket Size – the minimum size of the navigation graph buckets. Must be a positive non-zero number. Here we will explain in a little more detail.Essentially, this parameter allows you to customize the level of detail of the navigation graph. The smaller the parameter value, the higher the detail of the graph.

All game agents that will search for a path using Nav3D have their own size, determined by the radius that you give them when creating. (We will explain this a little later). The minimum cell size must be equal to the maximum radius of the agents, this will guarantee that the agent can go along any path in the graph. If there are agents on the scene whose radius exceeds the minimum bucket size of the navigation graph, then situations are possible when the agents collide obstacles on the stage. Future versions of Nav3D will implement agent size-dependent pathfinding.

*If the Init On Awake and Dispose On Destroy options are disabled, it will be your responsibility to initialize and dispose Nav3D resources. For initialization you will need to call the Nav3DInitializer.Init() method, for disposal – Nav3DInitializer.Utilize(). The value of the Min Bucket Size parameter can also be set via code; to do this, use the MinBucketSize property.

4.2 Nav3DManager

Nav3DManager is a helper static class. Can be useful for checking whether Nav3D has initialized and/or performing certain actions on the initialization

There are implemented the following members:

  • A bool Inited property that indicates whether Nav3D has already been initialized.
  • Event event Action OnNav3DInit. It fires immediately after Nav3D is initialized. By subscribing to it you will be able to perform any actions with Nav3D initialization. When you subscribe to an event, your delegate will work instantly, if initialization has already been done previously.
  • Method IsPointInsideOccupiedVolume(Vector3 _Point). Can be useful for determining whether the point is inside of the space occupied by any obstacle.

If you try to use public methods from Nav3D.API namespace before Nav3D is initialized, a Nav3DManagerNotInitializedException will be thrown. Any actions with Nav3D entities may be performed only after its initialization.

5. Nav3DObstacle

Nav3D allows you to use game objects in the scene as obstacles with a MeshFilter component with a Mesh assigned, or with a Terrain component.

*For obstacles using MeshFilter, make sure the mesh import settings “Read/Write Enabled” flag is set to true.

Attach the Nav3DObstacle component to a game object that you want to be an obstacle in the scene.

You will see the component inspector:

There are following settings:

  • Selecting an obstacle processing mode (obstacles processing must be performed after Nav3D is initialized, so that obstacles are taken into account when pathfinding performs to agents can avoid them while moving):
    • Runtime – the obstacle will be processed directly during playmode after Nav3D is initialized. This can be useful if an obstacle is generated during playmode.
    • Load from binary – the obstacle will be loaded from a pre-baked binary file. In most cases, the configuration of a game scene is known in advance, even before the scene is loaded and Nav3D is initialized. In such cases, it is always preferable to bake the scene obstacles in editor mode and load them from the binary file at the start of the scene. Loading from a binary file is always much faster than processing an obstacle directly at runtime.
  • Process children – if enabled, then information about the MeshFilter and Terrain components will be collected for all children of the transform hierarchy. And all children who have these components will be taken into account when processing the obstacle.

*If you want any child element of an obstacle containing a MeshFilter or Terrain not to be taken into account when constructing the navigation graph, then attach the Nav3DObstacleIgnoreTag component to it.

  • Auto-update on change – if enabled, then if the position, rotation or scale of the transform component of an obstacle changes, it will cause it to recalculate the obstacle navigation graph. (The obstacle will first be removed from the obstacle store, then re-processed and added to it.)This function is available for use only for obstacles with the selected Runtime processing mode.

*Since adding an obstacle is always a time-consuming process, updating the obstacle too often can have a negative impact on performance. We recommend using this function for small, isolated obstacles.

  • Update min period – how often the obstacle should be updated (in seconds) when the “Update automatically on transform change” option is enabled.

For runtime obstacles, it is possible to remove/re-add them to the storage directly during the playmode. Addition occurs when OnEnable() is invoked, removal occurs when OnDisable() is invoked. Accordingly, any runtime obstacle created on the scene during the playmode will be processed and added to the storage. If you delete or disable an obstacle game object, it will be removed from storage. Re-enabling an obstacle will cause it to be re-added to storage.

5.1 Nav3DObstacleLoader

To use the possibility of pre-baking obstacles on the scene in editor mode and then loading them from a binary file, the Nav3DObstacleLoader component is used. You can create it on the scene using the following top menu button:


The following game object will appear on the scene:


For all obstacles in the scene that you want to bake, select the “Load from binary” processing mode.


Next, in the Nav3DObstacleLoader component inspector, you can see a list of all game objects with the Nav3DObstacle component that are subject to baking.


Click the “Bake and serialize obstacles” button and select a folder in the project to save a binary file with baked data about obstacles on the scene.

After successful baking, the Nav3DObstacleLoader component inspector will look like this:


The inspector of successfully serialized Nav3DObstacle will look like this:

Now in game mode, when Nav3D is initialized, the navigation graphs of all baked obstacles on the scene will be loaded from a binary file.

*There is an important note regarding game objects for which static batching is enabled. When loading the navigation graph from a binary file, Nav3DObstacleLoader tries to check the correspondence of the data in the binary file and the current parameters of the obstacle on the scene (the structure of the transform hierarchy, the transform component fields, the presence of a valid mesh in the MeshFilter, and so on). This check is needed to throw an exception and thereby notify the user that the baked navigation file has become obsolete, since the obstacle was changed after saving the binary file. If static batching is enabled for a group of obstacles, validation will never be successful because the obstacle mesh cannot be accessed. So we added the option to disable validation. To do this, uncheck “Validate serialized data” in the Nav3DObstacleLoader inspector.

5.2 Deeper dive into obstacles

  • As already described above, in order for an obstacle to be taken into account during pathfinding, you need to attach a Nav3DObstacle component to its game object.
  • Nav3D has an obstacle storage that is used during pathfinding. It stores navigation graphs of obstacles on the scene.
  • All operations with obstacles (adding or removing) are placed in an execution queue and performed sequentially in a separate thread.
  • Obstacle processing means constructing a passability graph (also known as a navigation graph) for each obstacle, or for a group of obstacles, and then adding this graph to the obstacle storage.

Navigation graphs are used during pathfinding on a scene.

The result of processing one obstacle or a group of obstacles can be one or more navigation graphs that do not intersect each other in space.

5.2.1 Operations with obstacles

Regardless of the obstacle processing mode, the processing procedure consists of several stages:

  1. Collecting information about the geometry of the obstacle for each Nav3DObstacle.

    At this stage, a list of all geometries that form an obstacle is obtained, then they are combined (clustered).

    Let’s say there are several children in the transform hierarchy of the obstacle, each of which has a MeshFilter with a Mesh assigned. Accordingly, in this case, several lists of triangles that make up the meshes will be obtained. Next, for each list of triangles, the enclosing volume will be defined in the form of Bounds. Those lists whose Bounds intersect will be merged. We will call each such individual list an “obstacle volume.” The result is one or more obstacle volumes. This will be done for every Nav3DObstacle processed in the scene.

  2. Clustering with already processed obstacles.

    It is checked whether the volumes of the newly procсessing obstacle intersect with the volumes of obstacles already in the storage. If yes, then clustering occurs with obstacles already added. The result is a new list of obstacle volumes.

  3. Removing obsolete volumes of stored obstacles from storage.

    Those volumes that intersected with the volumes of the newly processing obstacle and that were included in the new (clustered) volumes are considered obsolete.

  4. Next, navigation graphs are constructed for new volumes.

    These volumes are then added to the obstacle storage.

Removing an obstacle from a storage consists of the following steps:

  1. From the storage, a list of all volumes containing triangles of the obstacle being removed is obtained (each volume can contain triangles of several obstacles).
  2. For each volume, the triangles of the obstacle to be removed are removed from the resulting list.
  3. Further, only volumes in which triangles still remain after removal are considered. For these volumes, the embracing Bounds are recalculated.
  4. All volumes from the original list are removed from the obstacle storage.
  5. All remaining volumes with recalculated Bounds are clustered and added back to the obstacle storage.

5.2.2 Obstacle combinations

We will call obstacles with the selected processing mode “Runtime” as runtime obstacles, and those with the “Load from binary” mode as static obstacles.

If you create a runtime obstacle during game mode, it will be processed and added to the storage (when OnEnable() is triggered). If you disable an already processed runtime obstacle on the scene, it will be removed from the storage (when OnDisable() is triggered).

Static obstacles are meant to be static in the sense that they cannot be added or removed in playmode. They will be present in the scene from the moment they are loaded from the file until Nav3D is deinitialized.

Since the above operations of adding and removing for a specific obstacle can affect the volumes of other obstacles on the scene, a conflict arises between static and runtime obstacles if their volumes intersect in space.

So we decided to introduce a few restrictions:

  • At the time of initialization, all static obstacles are first loaded and added, only then runtime obstacles are processed and added (if there are any on the scene).
  • When processing and adding a runtime obstacle, its volume must not intersect the volumes of static obstacles, otherwise an IntersectStaticObstacleException will be thrown.
  • As mentioned above, adding several runtime obstacles can lead to the fact that a combined volume will be formed for them that is larger than each of their volumes separately. Your task is to ensure that the possible combined volume does not intersect the volumes of static obstacles. To check for such a potential collision there is a method Nav3DManager.BoundsCrossStaticObstacles(Bounds _Bounds).

To avoid such situations, we suggest that you completely avoid using static and runtime obstacles together on the same scene.

If you still decide to use both types, we recommend creating runtime obstacles far from static obstacles in order to minimize the likelihood of volumes intersecting.

6. Nav3DManager

Nav3DManager is a helper static class. Can be useful for checking whether Nav3D has initialized and/or performing certain actions on the initialization

There are implemented the following members:

  • A bool Inited property that indicates whether Nav3D has already been initialized.
  • Event event Action OnNav3DInit. It fires immediately after Nav3D is initialized. By subscribing to it you will be able to perform any actions with Nav3D initialization. When you subscribe to an event, your delegate will work instantly, if initialization has already been done previously.
  • Method IsPointInsideOccupiedVolume(Vector3 _Point). Can be useful for determining whether the point is inside of the space occupied by any obstacle.

If you try to use public methods from Nav3D.API namespace before Nav3D is initialized, a Nav3DManagerNotInitializedException will be thrown. Any actions with Nav3D entities may be performed only after its initialization.

7. Obstacle combinations

We will call obstacles with the selected processing mode “Runtime” as runtime obstacles, and those with the “Load from binary” mode as static obstacles.

If you create a runtime obstacle during game mode, it will be processed and added to the storage (when OnEnable() is triggered). If you disable an already processed runtime obstacle on the scene, it will be removed from the storage (when OnDisable() is triggered).

Static obstacles are meant to be static in the sense that they cannot be added or removed in playmode. They will be present in the scene from the moment they are loaded from the file until Nav3D is deinitialized.

Since the above operations of adding and removing for a specific obstacle can affect the volumes of other obstacles on the scene, a conflict arises between static and runtime obstacles if their volumes intersect in space.

So we decided to introduce a few restrictions:

  • At the time of initialization, all static obstacles are first loaded and added, only then runtime obstacles are processed and added (if there are any on the scene).
  • When processing and adding a runtime obstacle, its volume must not intersect the volumes of static obstacles, otherwise an IntersectStaticObstacleException will be thrown.
  • As mentioned above, adding several runtime obstacles can lead to the fact that a combined volume will be formed for them that is larger than each of their volumes separately. Your task is to ensure that the possible combined volume does not intersect the volumes of static obstacles. To check for such a potential collision there is a method Nav3DManager.BoundsCrossStaticObstacles(Bounds _Bounds).

To avoid such situations, we suggest that you completely avoid using static and runtime obstacles together on the same scene.

If you still decide to use both types, we recommend creating runtime obstacles far from static obstacles in order to minimize the likelihood of volumes intersecting.

8. Nav3DParticularResolutionRegion

It is possible to define space regions in which a particular minimum bucket size of the navigation graph can be specified.

Let’s imagine a situation where a suitable minimum bucket size of the search graph (resolution) is 1. However, there are several tight areas in your game scene where a resolution of 1 does not give sufficient detail to the navigation graph. In such a situation, you can of course reduce the minimum size of the search graph buckets for the entire space of your scene, but this will lead to an increase in the processing time for obstacles, as well as an increase in the average pathfinding time on the scene.

The best way out in such a situation would be to reduce the size of the buckets only in the area where you want to increase the detail of the search graph.

To do this, we implemented the Nav3DParticularResolutionRegion object, which allows you to specify a region in space in which a specific minimum bucket size of the navigation graph will be used when processing an obstacle.

8.1 Nav3DParticularResolutionRegion: Usage

To create graph particular resolution region, use the following top menu button:

Set the required position on the scene for it, then in the inspector of the Nav3DParticularResolutionRegion component, set the region sizes, and also specify the desired minimum size of the navigation graph buckets. To draw the region, turn on Gizmos in the scene window.

Below is a navigation graph for two identical obstacles, one of which is located in a region with a minimum bucket size of the graph = 0.2. The second one is outside the region and the minimum bucket size of the pathfinding graph on the whole scene is set as = 0.4.

The obstacle on the right obviously has a more detailed navigation graph, since it is located in a region with a smaller minimum bucket size.

8.2 Nav3DParticularResolutionRegion: Some points

  • The use of the resolution regions is intended to solve problems related to the insufficiency of the graph detailing in tight areas of space, such as, for example, narrow tunnels, small holes through which it must be possible to find a path. But also in such regions, you can set the size of the minimum bucket larger than the bucket size set on the entire scene. This can be useful when, on the contrary, you want to avoid over-detailing the search graph for some obstacles. Avoiding excessively high resolution of the navigation graph will have a beneficial effect on overall pathfinding performance.
  • An octree is a hierarchical structure in which the sizes of all buckets are always a multiple of each other and from level to level the size changes with a multiplier of two (each next level contains buckets two times smaller than the previous one). So you can only specify the desired minimum bucket size. In fact, the actual minimum bucket size will be calculated relative to the size specified during Nav3D initialization. If, for example, at initialization, the minimum size was specified as 0.4, and you specify the desired minimum size as 0.3, then the size 0.2 will actually be chosen, since it should be a level lower and obtained from 0.4 divided by 2. If you choose the desired size as 0.7, then the actual size will be 0.8 since it must be a level higher and is multiplied by 2. The desired value of 0.9 becomes the actual value of 1.6. And so on.
  • If the obstacle is located inside the intersection of several regions with different minimum bucket sizes, the smallest value from the region values will be selected as the minimum bucket size during processing.
  • We recommend using regions as static objects that are on the scene when all obstacles are processed. The operation of adding/removing a region during runtime will entail re-processing those runtime obstacles that are intersected by the region. Static obstacles will not react in any way to removing/adding a region.Initialization and deinitialization of a region occurs through the OnEnable() and, accordingly, DoDisable() events in Nav3DParticularResolutionRegion. So to initialize a region, you can create its prefab on the stage, to deinitialize it, you can make its GameObject inactive, or destroy it

9. Nav3DObstacleLoader

To use the possibility of pre-baking obstacles on the scene in editor mode and then loading them from a binary file, the Nav3DObstacleLoader component is used. You can create it on the scene using the following top menu button:


The following game object will appear on the scene:


For all obstacles in the scene that you want to bake, select the “Load from binary” processing mode.


Next, in the Nav3DObstacleLoader component inspector, you can see a list of all game objects with the Nav3DObstacle component that are subject to baking.


Click the “Bake and serialize obstacles” button and select a folder in the project to save a binary file with baked data about obstacles on the scene.

After successful baking, the Nav3DObstacleLoader component inspector will look like this:


The inspector of successfully serialized Nav3DObstacle will look like this:

Now in game mode, when Nav3D is initialized, the navigation graphs of all baked obstacles on the scene will be loaded from a binary file.

*There is an important note regarding game objects for which static batching is enabled. When loading the navigation graph from a binary file, Nav3DObstacleLoader tries to check the correspondence of the data in the binary file and the current parameters of the obstacle on the scene (the structure of the transform hierarchy, the transform component fields, the presence of a valid mesh in the MeshFilter, and so on). This check is needed to throw an exception and thereby notify the user that the baked navigation file has become obsolete, since the obstacle was changed after saving the binary file. If static batching is enabled for a group of obstacles, validation will never be successful because the obstacle mesh cannot be accessed. So we added the option to disable validation. To do this, uncheck “Validate serialized data” in the Nav3DObstacleLoader inspector.

10. Creating and configuring a config via code

All Nav3DAgentConfig parameters can be configured through the code as well.

To do this, you should create a Nav3DAgentConfig instance, set correct parameter values, and then apply the instance to the agent.

  • It is suggested to use Nav3DAgentConfig.DefaultConfig to create a new instance.
  • There is a Copy() method to get a copy of the instance.
  • To apply config to the agent it is needed to use the Nav3DAgent.SetConfig(Nav3DAgentConfig _Config) method.

Below is an example of creating a Nav3DAgentConfig instance and applying it to an agent.

				
					void ConfigureAgentConfig()
{
   Nav3DAgent myAgent = GetComponent<Nav3DAgent>();

   //create Nav3DAgentConfig instance with default parameters
   Nav3DAgentConfig myConfig = Nav3DAgentConfig.DefaultConfig;

   //set the parameters you want
   myConfig.Radius = 1.2f;
   myConfig.MotionNavigationType = MotionNavigationType.LOCAL;

   //apply config to agent
   myAgent.SetConfig(myConfig.Copy());
}


11. Nav3DPath

The Nav3DPath class is designed to perform pathfinding in scene space.

In general, objects of this type are used by agents (Nav3DAgent) when performing a path search. But you can also use it separately for your own purposes.

Of course, working with Path objects is only possible after Nav3D has been initialized. Read more in “Nav3DInitializer” section.

11.1 Nav3DPathfindingManager

This class contains few properties to manage pathfinding tasks limitations..

To achieve the required level of performance when using Nav3D, the following properties can be useful:

  • public static int CurrentPathfindingTasksCount – shows how many parallel pathfinding tasks are currently active;
  • public static int MaxPathfindingTasks – allows you to limit a number of pathfinding tasks running simultaneously. By default, this property is set to Environment.ProcessorCount - 1

11.2 Nav3DPath: Pathfinding

To perform pathfinding you need to do: 

  1. Create a Nav3DPath instance using constructor new Nav3DPath().
  2. Call one of the following methods:

To search a path between 2 points:

				
					public void Find(
Vector3 _Start,
Vector3 _End,
Action _OnSuccess = null,
Action<PathfindingError> _OnFail = null
)


Parameters meaning:

  • Action _OnSuccess – successful pathfinding completion callback.
  • Action<PathfindingError> _OnFail – pathfinding fail callback, contains some info about error.

To search a path between more than 2 points:

				
					public void Find(
       Vector3[] _Targets,
       bool _Loop,
       bool _SkipUnpassableTargets = false,
       Action _OnSuccess = null,
       Action<PathfindingError> _OnFail = null
   )


Parameters meaning:

  • bool  _Loop – whether need  to loop the path (if true then the end and start points will be connected by path as well).
  • bool  _SkipUnpassableTargets – whether skip any point pathfinding to which was failed. If true, then the failure to find a path between any pair of points will lead to pathfinding abort and _OnFail callback to be invoked.

It is possible to repeat the last pathfinding procedure. It can be useful in case when the scene configuration has changed and the last found path is no longer relevant.

To do this, call the public void Update() method.

11.3 Nav3DPath: Properties

  • public bool IsValid { get; } – indicates whether the last pathfinding performed was successful. The value becomes false if the value of any Smooth or SmoothRatio property has changed.
  • public bool IsPathfindingInProgress { get; } – whether pathfinding currently in progress.
  • public Vector3[] Trajectory { get; } – the last found path trajectory. Use the IsValid property to ensure that the value is relevant.
  • public Bounds Bounds { get; } – the volume of the space that is occupied by the found path.
  • public bool Smooth { get; set; } – whether need to smooth the path when pathfinding.
  • public int SmoothRatio { get; set; } – a count of smoothing samples per min. search graph bucket. By default it is set to 3. It is not recommended to increase this value unnecessarily, as this will increase the time spent on pathfinding.
  • public int Timeout { get; set; } – the limit for the pathfinding duration. If the pathfinding takes longer, the Action<PathfindingError> _OnFail callback will be invoked.
  • public bool TryRepositionStartIfOccupied { get; set; } – if true, then in case if the start pathfinding point is inside of the bucket occupied by any obstacle, try to search a path from any free neighbor bucket.
  • public bool TryRepositionTargetIfOccupied  { get; set; } – if true, then in case if the target pathfinding point is inside of the bucket occupied by any obstacle, try to search a path to any free neighbor bucket.
  • public PathfindingResult { get; } – the result of the last successful pathfinding.

11.4 Nav3DPath: Events

For the convenience of notification when the pathfinding finished, the following events have been implemented:

  • public event Action OnPathfindingSuccess – triggers when pathfinding finished successfully.
  • public event Action<PathfindingError> OnPathfindingFail – triggers when pathfinding ends with failure.
  • public event Action OnPathfindingComplete – triggers in both cases.

11.5 Nav3DPath: Dispose

You have to call the Nav3DPath.Dispose() method when working with the Nav3DPath instance is completed. This is quite important because each initialized path takes some computational resources to track intersection with newly added obstacles. So in order to unsubscribe from obstacles storage updating you need to call Dispose().

11.6 PathfindingError

Contains error info in case of _OnFail callback invocation.

Contains two properties:

  • public PathfindingResultCode Reason – the reason why the pathfinding failed.
    Possible values:
ValueDescription
SUCCEEDEDPathfinding finished successfully.
PATH_DOES_NOT_EXISTThere is no path between points. This is possible if at least one of the neighborhood points is surrounded by all sides.
TIMEOUTThe pathfinding took longer than allowed and was aborted.
CANCELEDPathfinding was canceled by the user or Nav3D internal logic.
START_POINT_INSIDE_OBSTACLEPathfinding has been canceled because the start point of the path is inside an obstacle.
TARGET_POINT_INSIDE_OBSTACLEPathfinding has been canceled because the target point of the path is inside an obstacle.
UNKNOWNInternal error.
  • public string Msg – message with more detailed information about the error.

11.7 PathfindingResult

Contains the pathfinding data and time statistics.

Time statistics:

    • public TimeSpan PathfindingDuration { get; } – duration of the pathfinding algorithm execution (A*).
    • public TimeSpan OptimizingDuration  { get; } – duration of the optimization algorithm execution.
    • public TimeSpan SmoothingDuration   { get; } – duration of the smoothing algorithm execution.

Pathfinding data:

    • public Vector3[] RawPath { get; } – the source path obtained as the result of A* execution.
    • public Vector3[] PathOptimized { get; } – the path obtained after optimization algorithm execution.
    • public Vector3[] PathSmoothed  { get; } – the path obtained after smoothing algorithm execution. If Smooth = false, then the value will be equal to PathOptimized.
    • public int[] TargetIndices { get; } – the indices of the target points in the PathSmoothed array. The target points mean the points used when calling Nav3DPath.Find().
    • public PathfindingResultCode Result { get; } – pathfinding result code.

11.8 Usage example

Below presented an example of how to search for a path from A to B using Nav3DPath.

				
					using Nav3D.API;
using System;
using System.Linq;
using UnityEngine;

class YourGameScenario : MonoBehaviour
{
   #region Attributes

   Vector3[] m_FoundPath;

   #endregion
  
   #region Unity events

   void Start()
   {
       Nav3DManager.OnNav3DInit += () =>
       {
           Vector3 a = new Vector3(-10, -10, -10);
           Vector3 b = new Vector3(10, 10, 10);

           FindPath(a, b, PrintPath);
       };
   }

   void OnDrawGizmos()
   {
       if (!Application.isPlaying || !enabled)
           return;

       if (m_FoundPath != null && m_FoundPath.Any())
       {
           for (int i = 0; i < m_FoundPath.Length - 1; i++)
               Gizmos.DrawLine(m_FoundPath[i], m_FoundPath[i + 1]);
       }
   }
  
   #endregion

   #region Service methods

   //your method for pathfinding from A to B
   void FindPath(Vector3 _A, Vector3 _B, Action<Vector3[]> _OnPathFound)
   {
       //create Nav3DPathPath instance
       Nav3DPath path = new Nav3DPath(gameObject.name);

       //perform pathfinding from _A to _B
       path.Find(
               _A,
               _B,
               _OnSuccess: () =>
               {
                   //notify that path was found
                   Debug.Log("Path successfully found!");

                   //invoke callback
                   _OnPathFound(path.Trajectory);

                   //finish work with Nav3DPath instance
                   path.Dispose();
               }
           );
   }

   void PrintPath(Vector3[] _Path)
   {
       m_FoundPath = _Path;

       Debug.Log($"Path points: {string.Join(", ", m_FoundPath)}");
   }

   #endregion
}


11.9 Nav3DPathTester

We implemented a useful component (Nav3DPathTester), which can be used while building a scene to check how exactly the path passes in different areas.

  • To use it, you should attach the Nav3DPathTester component to any game object in the scene.
  • Use of the Nav3DPathTester is only possible in play mode.

After attaching the component you’ll see its inspector:

The purpose of all parameters is the same as the Nav3DPath.Find() parameters.

Add some game objects that you want to use as pathfinding target points. Then add these objects to the Targets list in the Nav3DPathTester inspector.

In play mode, with Gizmos enabled, you can see how the path passes through the target points.

Below are two examples of pathfinding for the case of three target points, with the Loop option enabled and disabled.

12. Deeper dive into obstacles

  • As already described above, in order for an obstacle to be taken into account during pathfinding, you need to attach a Nav3DObstacle component to its game object.
  • Nav3D has an obstacle storage that is used during pathfinding. It stores navigation graphs of obstacles on the scene.
  • All operations with obstacles (adding or removing) are placed in an execution queue and performed sequentially in a separate thread.
  • Obstacle processing means constructing a passability graph (also known as a navigation graph) for each obstacle, or for a group of obstacles, and then adding this graph to the obstacle storage.

Navigation graphs are used during pathfinding on a scene.

The result of processing one obstacle or a group of obstacles can be one or more navigation graphs that do not intersect each other in space.

12.1 Operations with obstacles

Regardless of the obstacle processing mode, the processing procedure consists of several stages:

  1. Collecting information about the geometry of the obstacle for each Nav3DObstacle.

    At this stage, a list of all geometries that form an obstacle is obtained, then they are combined (clustered).

    Let’s say there are several children in the transform hierarchy of the obstacle, each of which has a MeshFilter with a Mesh assigned. Accordingly, in this case, several lists of triangles that make up the meshes will be obtained. Next, for each list of triangles, the enclosing volume will be defined in the form of Bounds. Those lists whose Bounds intersect will be merged. We will call each such individual list an “obstacle volume.” The result is one or more obstacle volumes. This will be done for every Nav3DObstacle processed in the scene.

  2. Clustering with already processed obstacles.

    It is checked whether the volumes of the newly procсessing obstacle intersect with the volumes of obstacles already in the storage. If yes, then clustering occurs with obstacles already added. The result is a new list of obstacle volumes.

  3. Removing obsolete volumes of stored obstacles from storage.

    Those volumes that intersected with the volumes of the newly processing obstacle and that were included in the new (clustered) volumes are considered obsolete.

  4. Next, navigation graphs are constructed for new volumes.

    These volumes are then added to the obstacle storage.

Removing an obstacle from a storage consists of the following steps:

  1. From the storage, a list of all volumes containing triangles of the obstacle being removed is obtained (each volume can contain triangles of several obstacles).
  2. For each volume, the triangles of the obstacle to be removed are removed from the resulting list.
  3. Further, only volumes in which triangles still remain after removal are considered. For these volumes, the embracing Bounds are recalculated.
  4. All volumes from the original list are removed from the obstacle storage.
  5. All remaining volumes with recalculated Bounds are clustered and added back to the obstacle storage.

12.2 Obstacle combinations

We will call obstacles with the selected processing mode “Runtime” as runtime obstacles, and those with the “Load from binary” mode as static obstacles.

If you create a runtime obstacle during game mode, it will be processed and added to the storage (when OnEnable() is triggered). If you disable an already processed runtime obstacle on the scene, it will be removed from the storage (when OnDisable() is triggered).

Static obstacles are meant to be static in the sense that they cannot be added or removed in playmode. They will be present in the scene from the moment they are loaded from the file until Nav3D is deinitialized.

Since the above operations of adding and removing for a specific obstacle can affect the volumes of other obstacles on the scene, a conflict arises between static and runtime obstacles if their volumes intersect in space.

So we decided to introduce a few restrictions:

  • At the time of initialization, all static obstacles are first loaded and added, only then runtime obstacles are processed and added (if there are any on the scene).
  • When processing and adding a runtime obstacle, its volume must not intersect the volumes of static obstacles, otherwise an IntersectStaticObstacleException will be thrown.
  • As mentioned above, adding several runtime obstacles can lead to the fact that a combined volume will be formed for them that is larger than each of their volumes separately. Your task is to ensure that the possible combined volume does not intersect the volumes of static obstacles. To check for such a potential collision there is a method Nav3DManager.BoundsCrossStaticObstacles(Bounds _Bounds).

To avoid such situations, we suggest that you completely avoid using static and runtime obstacles together on the same scene.

If you still decide to use both types, we recommend creating runtime obstacles far from static obstacles in order to minimize the likelihood of volumes intersecting.

13. Nav3DAgent

The Nav3DAgent is the main class responsible for the game agents movement in the scene space.

  1. Nav3DAgent public methods can only be used after Nav3D has been initialized. Read more in the Nav3DInitializer section.
  2. Use this class as the component for your game units.
  3. To use Nav3DAgent properly, you need to configure its parameters. There are many parameters for many behavior properties. Therefore, they are stored in a separate container class called Nav3DAgentConfig.

13.1 Nav3DAgentManager

This class implements several methods to get a list of all Nav3DAgents located inside a certain area of ​​the scene:

  • public static Nav3DAgent[] GetAgentsInBounds(Bounds _Bounds) – returns the list of all Nav3DAgents located inside a certain Bounds.
  • public static Nav3DAgent[] GetAgentsInSphere(Vector3 _Center, float _Radius) – returns a list of all Nav3DAgents located inside a sphere with center at _Center and radius of _Radius.

13.2 Nav3DAgentConfig

Nav3DAgentConfig serves as a parameters storage of the agent and allows you to customize its behavior and all necessary settings.

You can create an instance of it through the context menu of the Project tab.

After creating a config instance, in its inspector you will see the following list of parameter groups:

Here is an explanation of the purpose of the parameters and their allowable values.

Behavior

Option Property name in Nav3DAgentConfig Type Value range
Motion Navigation Type
MotionNavigationType
enum MotionNavigationType
COMBINED, GLOBAL, LOCAL

The main purpose of all agents is to move towards some target in space, be it another agent or a point in space. Agents can move using three ways of orientation in space:

  • Using the global path (GLOBAL). In this case, the agent will search for a path and will move along it, regardless of external conditions (other agents or edges of obstacles that are too close).
  • Using only local avoidance (LOCAL). The agent will not use pathfinding for movement, but will move towards the target in a straight line, dodging other agents and obstacles along the way when they meet on the course of movement. Of course, not every obstacle can be overcome in this way.
  • Finally, the agent can move towards the target using pathfinding and local avoidance at the same time (COMBINED). The agent will move along the found path and avoid other agents that come close, as well as obstacles that are too close.

Radius

Option Property name in Nav3DAgentConfig Type Value range
Radius
Radius
float
>0

The range of the agent is used to perform local evasion maneuvers. Establishing the correct radius is important for effective local traversal by both the agent itself and other agents nearby. We advise you to adjust the radius so that all the visual content of the game unit, which is the agent, is inside the sphere of the specified radius.

Speed

Option Property name in Nav3DAgentConfig Type Value range
Speed
Speed
float
>0

The agent’s speed. You can change it at any time if needed.

Option Property name in Nav3DAgentConfig Type Value range
Max Speed
Max Speed
float
>Speed

The maximum speed of the agent. This parameter is required to perform a local crawl. In some situations, the agent may need to speed up to avoid a collision. If the value is set too high, the agent may sometimes move jerkily when performing a local crawl. Therefore, we advise you to set the maximum speed a little more than Speed (less than one and a half times more).

For your convenience, there are two ways to set this value in the inspector. With a certain value. Or using a multiplier to increase the speed. We recommend using a multiplier so that the maximum speed depends on the agent’s speed. Then the maximum speed will change following the speed change at any time.

Local avoidance

Option Property name in Nav3DAgentConfig Type Value range
Agents considered number limit
bool
true, false

Allows you to limit the number of nearby agents considered for local crawling.
Enabling this option makes sense if you use a large number of agents in a limited space. In such a situation, each agent may have many neighbors, and performance may not be sufficient to ensure high fps if all nearby agents are taken into account in the calculations.

Option Property name in Nav3DAgentConfig Type Value range
Agents number
ConsideredAgentsNumberLimit
int
>=1

The number of agents that are taken into account from all nearby agents.

Option Property name in Nav3DAgentConfig Type Value range
Avoid static obstacles
AvoidStaticObstacles
bool
true, false

Whether to perform local avoidance for static obstacles.

There may be situations when an agent can get close to a static obstacle, for example by avoiding other agents or if its path is close to the obstacle.

It is not recommended to enable this option unless it is really necessary, as it affects performance.

Option Property name in Nav3DAgentConfig Type Value range
ORCA Tau
ORCATau
float
>0

The time range for calculating the velocity obstacle (VO). We do not recommend changing this parameter.

To better understand its meaning, the original article about ORCA: Reciprocal n-body Collision Avoidance. Jur van den Berg, Stephen J. Guy, Ming Lin, and Dinesh Manocha

Pathfinding

Option Property name in Nav3DAgentConfig Type Value range
Pathfinding timeout (ms)
PathfindingTimeout
int
>0

Maximum path search time. If the path search takes longer, the Action _OnFail callback will be executed if it was passed to UpdatePath().

Option Property name in Nav3DAgentConfig Type Value range
Smooth the path
SmoothPath
bool
true, false

Whether it is necessary to smooth the found path.

Option Property name in Nav3DAgentConfig Type Value range
Samples per min bucket volume
SmoothRatio
int
>0

The number of path segments per minimum octree cell size resulting from smoothing the original path. You should not excessively increase this parameter, as this increases the total pathfinding time..

Option Property name in Nav3DAgentConfig Type Value range
Auto-update path on stagnant behavior
AutoUpdatePath
bool
true, false

When using the local avoidance mechanism in combination with global pathfinding, a situation may arise when the path passes through an area of space where many other agents are present. Then our agent can deviate from the path found, trying to avoid collisions with other agents. This process can continue indefinitely, because, trying to return to the original trajectory, the agent will always deviate from it again, meeting with other agents.

Enable this option to automatically replace the path. Then, if the agent has moved away from its path far enough and is at a sufficiently large distance, the path will be found again from the agent’s current position.

Option Property name in Nav3DAgentConfig Type Value range
Auto-update cooldown (ms)
PathAutoUpdateCooldown
int
>=1

Minimum path auto-update period. If the area of space is too full of other agents, then path recalculation may be too frequent, which will negatively affect performance in case of a large number of agents in the scene. We recommend limiting the frequency of auto correction to a few seconds.

Option Property name in Nav3DAgentConfig Type Value range
Try reposition target if occupied
TryRepositionTargetIfOccupied
bool
true, false

Enabling this option allows attempting to perform pathfinding to an adjacent free bucket if the target point is located in a bucket occupied by an obstacle.

If the parameter is disabled then pathfinding will be cancelled and the GOAL_POINT_INSIDE_OBSTACLE error will be returned.

Motion

Option Property name in Nav3DAgentConfig Type Value range
Target reach distance
TargetReachDistance
float
>=0

The distance required to reach the goal. When you order an agent to reach a goal, the goal will be considered reached when the agent’s pivot point coincides with the goal coordinate (the distance between them will be 0). This can be inconvenient if the target is a hooked object, say, a planet in space. In this case, set this parameter equal to the sum of the radius of the visible part of the agent and the radius of the planet. Then the agent will stop when it reaches the surface of the planet.

Option Property name in Nav3DAgentConfig Type Value range
Max rotation in degrees per fixed update tick
MaxAgentDegreesRotationPerTick
float
>=0

The maximum number of degrees that the agent can rotate when performing a rotation in the direction of movement.
During the movement, the agent turns towards the velocity vector. If the velocity vector changes dramatically during movement, then the agent’s turn may look sharp. To make it smoother, set this parameter not too high.

Option Property name in Nav3DAgentConfig Type Value range
Rotation vector lerp factor
RotationVectorLerpFactor
float
(0 - 1)

In order to make the rotation of an agent even more smoother, when computing the rotation vector the frame rotation vector and the value of rotation vector for a few last frames are used.

Decreasing the parameter makes the rotation smoother, increasing it makes it sharper.

Velocity blending

When using global pathfinding and local avoidance, the agent moves using three velocity vectors:

  1. The velocity vector along the path.
  2. The velocity vector of avoidance from nearest agents.
  3. Obstacle avoidance velocity vector.

The agent blends these three velocities in different proportions and uses the resulting vector for movement. In order to tell the agent in what proportion to mix the speeds, we have introduced weights, the values ​​of which you can adjust.

Not all three velocities can be blended in all situations. For example, there may be no obstacles near the agent, then only the velocity of following the path and the velocity of the nearest agents avoidance will be mixed.

This way you can tell the agent how significant each rate should be when getting the resulting one. If it is preferable to follow the path, then the first weight can be made much larger than the last two. If it is imperative to perform local evasion maneuvers, then the weight of the velocity along the trajectory should be made much smaller than the weight of the evasion speeds.

Below are explanations of the weight parameters. Note that separate parameters are used for each situation.

All weights are floating and must be greater than 0.

The corresponding property names in Nav3DAgentConfig are:

  • PathVelocityWeight
  • PathVelocityWeight1
  • PathVelocityWeight2
  • AgentsAvoidanceVelocityWeight
  • AgentsAvoidanceVelocityWeight1
  • AgentsAvoidanceVelocityWeight2
  • ObstacleAvoidanceVelocityWeight
  • ObstacleAvoidanceVelocityWeight1
  • ObstacleAvoidanceVelocityWeight2

Debug

Option Property name in Nav3DAgentConfig Type Value range
Use log
UseLog
bool
true, false

Whether it is necessary to log agent work processes.

Option Property name in Nav3DAgentConfig Type Value range
Log records count
LogSize
int
>0

Agent log size.

13.2.1 Creating and configuring a config via code

All Nav3DAgentConfig parameters can be configured through the code as well.

To do this, you should create a Nav3DAgentConfig instance, set correct parameter values, and then apply the instance to the agent.

  • It is suggested to use Nav3DAgentConfig.DefaultConfig to create a new instance.
  • There is a Copy() method to get a copy of the instance.
  • To apply config to the agent it is needed to use the Nav3DAgent.SetConfig(Nav3DAgentConfig _Config) method.

Below is an example of creating a Nav3DAgentConfig instance and applying it to an agent.

				
					void ConfigureAgentConfig()
{
   Nav3DAgent myAgent = GetComponent<Nav3DAgent>();

   //create Nav3DAgentConfig instance with default parameters
   Nav3DAgentConfig myConfig = Nav3DAgentConfig.DefaultConfig;

   //set the parameters you want
   myConfig.Radius = 1.2f;
   myConfig.MotionNavigationType = MotionNavigationType.LOCAL;

   //apply config to agent
   myAgent.SetConfig(myConfig.Copy());
}


13.3 Nav3DAgent: Methods

As mentioned above, you should use the Nav3DAgent script as a component for your game object and access it via GetComponent() .

The following public methods have been implemented to operate with Nav3DAgent:

  • Applies the description for your agent.
				
					public void SetConfig(Nav3DAgentConfig _Config)
				
			
  • Begins agent movement to the target point.
				
					public void MoveTo(
Vector3                  _Point,
Action                   _OnReach           = null,
Action<PathfindingError> _OnPathfindingFail = null,
float?                   _ReachDistance     = null)


Parameters:

    • Vector3 _Point – target point.
    • Action _OnReach – a callback that invokes on target point has reached.
    • Action<PathfindingError> _OnPathfindingFail – pathfinding failure callback.
    • float? _ReachDistance – target point reach distance.
  • Starts agent movement through the set of points. Pathfinding performs sequentially from each point to the next one, therefore the resulting path passes through all given goal points
				
					public void MoveToPoints(
Vector3[]                _Points,
bool                     _Loop                  = false,
bool                     _StartFromClosest      = false,
bool                     _SkipUnpassableTargets = false,
float?                   _ReachDistance         = null,
Action<Vector3>  _OnTargetPointPassed           = null,
Action                   _OnFinished            = null,
Action<PathfindingError> _OnPathfindingFail     = null)


Parameters:

  • Vector3[] _Points – a target points.
  • bool _Loop – whether loop movement through the points. If true, then the agent will move through the points infinitely, going to the first one every time he reaches the last one.
  • bool_StartFromClosest – whether to start movement from the nearest point, and not from the first one.
  • bool_SkipUnpassableTargets – whether any point to which pathfinding was failed will be skipped. If option is disabled, the pathfinding failure for any pair of points will cause pathfinding to be aborted and _OnFail callback to be invoked.
  • float? _ReachDistance – distance to reach any target point.
  • Action<Vector3> _OnTargetPointPassed – a callback that invokes when any of the target points are passed.
  • Action _OnFinished – a callback that invokes when the last target is reached. This callback will never invoke if _Loop = true.
  • Action<PathfindingError> _OnPathfindingFail – pathfinding failure callback.
  • Starts the following of the transform movable target.

				
					public void FollowTarget(
Transform                _Target,
bool                     _FollowContinuously,
float                    _TargetOffsetUpdate,
float                    _TargetReachDistance   = 0,
Action                   _OnReach               = null,
Action                   _OnFail                = null,
Action<PathfindingError> _OnPathfindingFail     = null)


Parameters:

    • Transform _Target – a target transform to follow.
    • bool _FollowContinuously – whether to follow the target infinitely. If true, the agent will never finish following and never call _OnReach. When the target is reached the agent will merely wait until it continues the movement.
    • float _TargetOffsetUpdate – minimum target position delta that causes path re-search.
    • float _TargetReachDistance – distance to target transform required to finish following and invoke _OnReach.
    • Action _OnReach – on target reach callback.
    • Action _OnFail – callback that invokes if the target was destroyed or switched to inactive condition at the scene.
    • Action<PathfindingError> _OnPathfindingFail – pathfinding failure callback.
  • Stops any previous command (MoveTo, MoveToPoints, FollowTarget).
				
					public void Stop()
				
			
  • Returns agents array within radius _Radius that satisfy the given predicate _Predicate.
				
					public Nav3DAgent[] GetAgentsInRadius(float _Radius, Predicate<Nav3DAgent> _Predicate = null)


Examples of using Nav3DAgent can be found in the demo scenes located in Nav3D/Demo.

13.4 Nav3DAgent: Debug

The Nav3DAgent has an inspector that provides several useful functions to help with debugging and give a better understanding of the interaction of objects in the game scene.

13.4.1 Debug drawing

In this section, you can visualize the agent and his nearest environment. This should be done with Gizmos enabled on the game scene:

1.Visualization of the agent radius.

2. Visualization of normalized agent velocities.

Yellow – the path following velocity vector (the direction vector from the agent position to the next target point on the path).

Green – local avoidance vector.

Blue – the blended motion vector (a mixture of the path following vector and the local avoidance vector)

3. Visualization of the path the agent follows.

4. Visualization of nearby agents that can be taken into account when performing local avoidance.

When performing local avoidance, depending on the setting of the allowed number of agents under consideration (in the agent description), the n closest agents will be taken from all nearby agents.

5. Visualization of nearby obstacle triangles that are taken into account when performing local avoidance at the moment.

6. All enabled.

13.4.2 Agent log

Here you can copy the contents of the agent log to the clipboard by clicking the button if logging is enabled in the agent description.

13.5 Nav3DEvader

There is also a separate controller, whose behavior consists of just avoiding nearest agents and static obstacles, if they collide with it.

Its behavior looks quite interesting. The demo can be found in the Nav3D/Demo/EvadersCrowd folder.

Its inspector has following settings:

  • Radius – the radius for which collisions with other entities are checked.
  • Max Speed – the max. allowed speed for performing avoidance.
  • Speed Decay Factor – the speed decay factor after completing the avoidance maneuver. The higher the value, the faster Nav3DEvader will stop after avoiding a collision. The valid range of the value is (0-1).

13.6 Nav3DSphereShell

Represents a spherical shell that is perceived by other agents as an object to avoid. Nav3DSphereShell can be moved externally. Nav3DAgents and Nav3DEvaders will avoid collisions with it.

The behavior of Nav3DSphereShell is shown in the demo Nav3D/Demo/SphereShellDemo.

You can adjust the radius of the sphere in the Nav3DSphereShell inspector:

14. Debug drawing

In this section, you can visualize the agent and his nearest environment. This should be done with Gizmos enabled on the game scene:

1.Visualization of the agent radius.

2. Visualization of normalized agent velocities.

Yellow – the path following velocity vector (the direction vector from the agent position to the next target point on the path).

Green – local avoidance vector.

Blue – the blended motion vector (a mixture of the path following vector and the local avoidance vector)

3. Visualization of the path the agent follows.

4. Visualization of nearby agents that can be taken into account when performing local avoidance.

When performing local avoidance, depending on the setting of the allowed number of agents under consideration (in the agent description), the n closest agents will be taken from all nearby agents.

5. Visualization of nearby obstacle triangles that are taken into account when performing local avoidance at the moment.

6. All enabled.

15. Nav3DParticularResolutionRegion: Usage

To create graph particular resolution region, use the following top menu button:

Set the required position on the scene for it, then in the inspector of the Nav3DParticularResolutionRegion component, set the region sizes, and also specify the desired minimum size of the navigation graph buckets. To draw the region, turn on Gizmos in the scene window.

Below is a navigation graph for two identical obstacles, one of which is located in a region with a minimum bucket size of the graph = 0.2. The second one is outside the region and the minimum bucket size of the pathfinding graph on the whole scene is set as = 0.4.

The obstacle on the right obviously has a more detailed navigation graph, since it is located in a region with a smaller minimum bucket size.

16. Nav3DParticularResolutionRegion: Some points

  • The use of the resolution regions is intended to solve problems related to the insufficiency of the graph detailing in tight areas of space, such as, for example, narrow tunnels, small holes through which it must be possible to find a path. But also in such regions, you can set the size of the minimum bucket larger than the bucket size set on the entire scene. This can be useful when, on the contrary, you want to avoid over-detailing the search graph for some obstacles. Avoiding excessively high resolution of the navigation graph will have a beneficial effect on overall pathfinding performance.
  • An octree is a hierarchical structure in which the sizes of all buckets are always a multiple of each other and from level to level the size changes with a multiplier of two (each next level contains buckets two times smaller than the previous one). So you can only specify the desired minimum bucket size. In fact, the actual minimum bucket size will be calculated relative to the size specified during Nav3D initialization. If, for example, at initialization, the minimum size was specified as 0.4, and you specify the desired minimum size as 0.3, then the size 0.2 will actually be chosen, since it should be a level lower and obtained from 0.4 divided by 2. If you choose the desired size as 0.7, then the actual size will be 0.8 since it must be a level higher and is multiplied by 2. The desired value of 0.9 becomes the actual value of 1.6. And so on.
  • If the obstacle is located inside the intersection of several regions with different minimum bucket sizes, the smallest value from the region values will be selected as the minimum bucket size during processing.
  • We recommend using regions as static objects that are on the scene when all obstacles are processed. The operation of adding/removing a region during runtime will entail re-processing those runtime obstacles that are intersected by the region. Static obstacles will not react in any way to removing/adding a region.Initialization and deinitialization of a region occurs through the OnEnable() and, accordingly, DoDisable() events in Nav3DParticularResolutionRegion. So to initialize a region, you can create its prefab on the stage, to deinitialize it, you can make its GameObject inactive, or destroy it

17. Agent log

Here you can copy the contents of the agent log to the clipboard by clicking the button if logging is enabled in the agent description.

18. Nav3DPathfindingManager

This class contains few properties to manage pathfinding tasks limitations..

To achieve the required level of performance when using Nav3D, the following properties can be useful:

  • public static int CurrentPathfindingTasksCount – shows how many parallel pathfinding tasks are currently active;
  • public static int MaxPathfindingTasks – allows you to limit a number of pathfinding tasks running simultaneously. By default, this property is set to Environment.ProcessorCount - 1

19. Nav3DPath: Pathfinding

To perform pathfinding you need to do: 

  1. Create a Nav3DPath instance using constructor new Nav3DPath().
  2. Call one of the following methods:

To search a path between 2 points:

				
					public void Find(
Vector3 _Start,
Vector3 _End,
Action _OnSuccess = null,
Action<PathfindingError> _OnFail = null
)


Parameters meaning:

  • Action _OnSuccess – successful pathfinding completion callback.
  • Action<PathfindingError> _OnFail – pathfinding fail callback, contains some info about error.

To search a path between more than 2 points:

				
					public void Find(
       Vector3[] _Targets,
       bool _Loop,
       bool _SkipUnpassableTargets = false,
       Action _OnSuccess = null,
       Action<PathfindingError> _OnFail = null
   )


Parameters meaning:

  • bool  _Loop – whether need  to loop the path (if true then the end and start points will be connected by path as well).
  • bool  _SkipUnpassableTargets – whether skip any point pathfinding to which was failed. If true, then the failure to find a path between any pair of points will lead to pathfinding abort and _OnFail callback to be invoked.

It is possible to repeat the last pathfinding procedure. It can be useful in case when the scene configuration has changed and the last found path is no longer relevant.

To do this, call the public void Update() method.

20. Nav3DPath: Properties

  • public bool IsValid { get; } – indicates whether the last pathfinding performed was successful. The value becomes false if the value of any Smooth or SmoothRatio property has changed.
  • public bool IsPathfindingInProgress { get; } – whether pathfinding currently in progress.
  • public Vector3[] Trajectory { get; } – the last found path trajectory. Use the IsValid property to ensure that the value is relevant.
  • public Bounds Bounds { get; } – the volume of the space that is occupied by the found path.
  • public bool Smooth { get; set; } – whether need to smooth the path when pathfinding.
  • public int SmoothRatio { get; set; } – a count of smoothing samples per min. search graph bucket. By default it is set to 3. It is not recommended to increase this value unnecessarily, as this will increase the time spent on pathfinding.
  • public int Timeout { get; set; } – the limit for the pathfinding duration. If the pathfinding takes longer, the Action<PathfindingError> _OnFail callback will be invoked.
  • public bool TryRepositionStartIfOccupied { get; set; } – if true, then in case if the start pathfinding point is inside of the bucket occupied by any obstacle, try to search a path from any free neighbor bucket.
  • public bool TryRepositionTargetIfOccupied  { get; set; } – if true, then in case if the target pathfinding point is inside of the bucket occupied by any obstacle, try to search a path to any free neighbor bucket.
  • public PathfindingResult { get; } – the result of the last successful pathfinding.

21. Nav3DPath: Events

For the convenience of notification when the pathfinding finished, the following events have been implemented:

  • public event Action OnPathfindingSuccess – triggers when pathfinding finished successfully.
  • public event Action<PathfindingError> OnPathfindingFail – triggers when pathfinding ends with failure.
  • public event Action OnPathfindingComplete – triggers in both cases.

22. Nav3DPath: Dispose

You have to call the Nav3DPath.Dispose() method when working with the Nav3DPath instance is completed. This is quite important because each initialized path takes some computational resources to track intersection with newly added obstacles. So in order to unsubscribe from obstacles storage updating you need to call Dispose().

23. PathfindingError

Contains error info in case of _OnFail callback invocation.

Contains two properties:

  • public PathfindingResultCode Reason – the reason why the pathfinding failed.
    Possible values:
ValueDescription
SUCCEEDEDPathfinding finished successfully.
PATH_DOES_NOT_EXISTThere is no path between points. This is possible if at least one of the neighborhood points is surrounded by all sides.
TIMEOUTThe pathfinding took longer than allowed and was aborted.
CANCELEDPathfinding was canceled by the user or Nav3D internal logic.
START_POINT_INSIDE_OBSTACLEPathfinding has been canceled because the start point of the path is inside an obstacle.
TARGET_POINT_INSIDE_OBSTACLEPathfinding has been canceled because the target point of the path is inside an obstacle.
UNKNOWNInternal error.
  • public string Msg – message with more detailed information about the error.

24. PathfindingResult

Contains the pathfinding data and time statistics.

Time statistics:

    • public TimeSpan PathfindingDuration { get; } – duration of the pathfinding algorithm execution (A*).
    • public TimeSpan OptimizingDuration  { get; } – duration of the optimization algorithm execution.
    • public TimeSpan SmoothingDuration   { get; } – duration of the smoothing algorithm execution.

Pathfinding data:

    • public Vector3[] RawPath { get; } – the source path obtained as the result of A* execution.
    • public Vector3[] PathOptimized { get; } – the path obtained after optimization algorithm execution.
    • public Vector3[] PathSmoothed  { get; } – the path obtained after smoothing algorithm execution. If Smooth = false, then the value will be equal to PathOptimized.
    • public int[] TargetIndices { get; } – the indices of the target points in the PathSmoothed array. The target points mean the points used when calling Nav3DPath.Find().
    • public PathfindingResultCode Result { get; } – pathfinding result code.

25. Usage example

Below presented an example of how to search for a path from A to B using Nav3DPath.

				
					using Nav3D.API;
using System;
using System.Linq;
using UnityEngine;

class YourGameScenario : MonoBehaviour
{
   #region Attributes

   Vector3[] m_FoundPath;

   #endregion
  
   #region Unity events

   void Start()
   {
       Nav3DManager.OnNav3DInit += () =>
       {
           Vector3 a = new Vector3(-10, -10, -10);
           Vector3 b = new Vector3(10, 10, 10);

           FindPath(a, b, PrintPath);
       };
   }

   void OnDrawGizmos()
   {
       if (!Application.isPlaying || !enabled)
           return;

       if (m_FoundPath != null && m_FoundPath.Any())
       {
           for (int i = 0; i < m_FoundPath.Length - 1; i++)
               Gizmos.DrawLine(m_FoundPath[i], m_FoundPath[i + 1]);
       }
   }
  
   #endregion

   #region Service methods

   //your method for pathfinding from A to B
   void FindPath(Vector3 _A, Vector3 _B, Action<Vector3[]> _OnPathFound)
   {
       //create Nav3DPathPath instance
       Nav3DPath path = new Nav3DPath(gameObject.name);

       //perform pathfinding from _A to _B
       path.Find(
               _A,
               _B,
               _OnSuccess: () =>
               {
                   //notify that path was found
                   Debug.Log("Path successfully found!");

                   //invoke callback
                   _OnPathFound(path.Trajectory);

                   //finish work with Nav3DPath instance
                   path.Dispose();
               }
           );
   }

   void PrintPath(Vector3[] _Path)
   {
       m_FoundPath = _Path;

       Debug.Log($"Path points: {string.Join(", ", m_FoundPath)}");
   }

   #endregion
}


26. Nav3DPathTester

We implemented a useful component (Nav3DPathTester), which can be used while building a scene to check how exactly the path passes in different areas.

  • To use it, you should attach the Nav3DPathTester component to any game object in the scene.
  • Use of the Nav3DPathTester is only possible in play mode.

After attaching the component you’ll see its inspector:

The purpose of all parameters is the same as the Nav3DPath.Find() parameters.

Add some game objects that you want to use as pathfinding target points. Then add these objects to the Targets list in the Nav3DPathTester inspector.

In play mode, with Gizmos enabled, you can see how the path passes through the target points.

Below are two examples of pathfinding for the case of three target points, with the Loop option enabled and disabled.

27. Nav3DAgentManager

This class implements several methods to get a list of all Nav3DAgents located inside a certain area of ​​the scene:

  • public static Nav3DAgent[] GetAgentsInBounds(Bounds _Bounds) – returns the list of all Nav3DAgents located inside a certain Bounds.
  • public static Nav3DAgent[] GetAgentsInSphere(Vector3 _Center, float _Radius) – returns a list of all Nav3DAgents located inside a sphere with center at _Center and radius of _Radius.

28. Nav3DAgentConfig

Nav3DAgentConfig serves as a parameters storage of the agent and allows you to customize its behavior and all necessary settings.

You can create an instance of it through the context menu of the Project tab.

After creating a config instance, in its inspector you will see the following list of parameter groups:

Here is an explanation of the purpose of the parameters and their allowable values.

Behavior

Option Property name in Nav3DAgentConfig Type Value range
Motion Navigation Type
MotionNavigationType
enum MotionNavigationType
COMBINED, GLOBAL, LOCAL

The main purpose of all agents is to move towards some target in space, be it another agent or a point in space. Agents can move using three ways of orientation in space:

  • Using the global path (GLOBAL). In this case, the agent will search for a path and will move along it, regardless of external conditions (other agents or edges of obstacles that are too close).
  • Using only local avoidance (LOCAL). The agent will not use pathfinding for movement, but will move towards the target in a straight line, dodging other agents and obstacles along the way when they meet on the course of movement. Of course, not every obstacle can be overcome in this way.
  • Finally, the agent can move towards the target using pathfinding and local avoidance at the same time (COMBINED). The agent will move along the found path and avoid other agents that come close, as well as obstacles that are too close.

Radius

Option Property name in Nav3DAgentConfig Type Value range
Radius
Radius
float
>0

The range of the agent is used to perform local evasion maneuvers. Establishing the correct radius is important for effective local traversal by both the agent itself and other agents nearby. We advise you to adjust the radius so that all the visual content of the game unit, which is the agent, is inside the sphere of the specified radius.

Speed

Option Property name in Nav3DAgentConfig Type Value range
Speed
Speed
float
>0

The agent’s speed. You can change it at any time if needed.

Option Property name in Nav3DAgentConfig Type Value range
Max Speed
Max Speed
float
>Speed

The maximum speed of the agent. This parameter is required to perform a local crawl. In some situations, the agent may need to speed up to avoid a collision. If the value is set too high, the agent may sometimes move jerkily when performing a local crawl. Therefore, we advise you to set the maximum speed a little more than Speed (less than one and a half times more).

For your convenience, there are two ways to set this value in the inspector. With a certain value. Or using a multiplier to increase the speed. We recommend using a multiplier so that the maximum speed depends on the agent’s speed. Then the maximum speed will change following the speed change at any time.

Local avoidance

Option Property name in Nav3DAgentConfig Type Value range
Agents considered number limit
bool
true, false

Allows you to limit the number of nearby agents considered for local crawling.
Enabling this option makes sense if you use a large number of agents in a limited space. In such a situation, each agent may have many neighbors, and performance may not be sufficient to ensure high fps if all nearby agents are taken into account in the calculations.

Option Property name in Nav3DAgentConfig Type Value range
Agents number
ConsideredAgentsNumberLimit
int
>=1

The number of agents that are taken into account from all nearby agents.

Option Property name in Nav3DAgentConfig Type Value range
Avoid static obstacles
AvoidStaticObstacles
bool
true, false

Whether to perform local avoidance for static obstacles.

There may be situations when an agent can get close to a static obstacle, for example by avoiding other agents or if its path is close to the obstacle.

It is not recommended to enable this option unless it is really necessary, as it affects performance.

Option Property name in Nav3DAgentConfig Type Value range
ORCA Tau
ORCATau
float
>0

The time range for calculating the velocity obstacle (VO). We do not recommend changing this parameter.

To better understand its meaning, the original article about ORCA: Reciprocal n-body Collision Avoidance. Jur van den Berg, Stephen J. Guy, Ming Lin, and Dinesh Manocha

Pathfinding

Option Property name in Nav3DAgentConfig Type Value range
Pathfinding timeout (ms)
PathfindingTimeout
int
>0

Maximum path search time. If the path search takes longer, the Action _OnFail callback will be executed if it was passed to UpdatePath().

Option Property name in Nav3DAgentConfig Type Value range
Smooth the path
SmoothPath
bool
true, false

Whether it is necessary to smooth the found path.

Option Property name in Nav3DAgentConfig Type Value range
Samples per min bucket volume
SmoothRatio
int
>0

The number of path segments per minimum octree cell size resulting from smoothing the original path. You should not excessively increase this parameter, as this increases the total pathfinding time..

Option Property name in Nav3DAgentConfig Type Value range
Auto-update path on stagnant behavior
AutoUpdatePath
bool
true, false

When using the local avoidance mechanism in combination with global pathfinding, a situation may arise when the path passes through an area of space where many other agents are present. Then our agent can deviate from the path found, trying to avoid collisions with other agents. This process can continue indefinitely, because, trying to return to the original trajectory, the agent will always deviate from it again, meeting with other agents.

Enable this option to automatically replace the path. Then, if the agent has moved away from its path far enough and is at a sufficiently large distance, the path will be found again from the agent’s current position.

Option Property name in Nav3DAgentConfig Type Value range
Auto-update cooldown (ms)
PathAutoUpdateCooldown
int
>=1

Minimum path auto-update period. If the area of space is too full of other agents, then path recalculation may be too frequent, which will negatively affect performance in case of a large number of agents in the scene. We recommend limiting the frequency of auto correction to a few seconds.

Option Property name in Nav3DAgentConfig Type Value range
Try reposition target if occupied
TryRepositionTargetIfOccupied
bool
true, false

Enabling this option allows attempting to perform pathfinding to an adjacent free bucket if the target point is located in a bucket occupied by an obstacle.

If the parameter is disabled then pathfinding will be cancelled and the GOAL_POINT_INSIDE_OBSTACLE error will be returned.

Motion

Option Property name in Nav3DAgentConfig Type Value range
Target reach distance
TargetReachDistance
float
>=0

The distance required to reach the goal. When you order an agent to reach a goal, the goal will be considered reached when the agent’s pivot point coincides with the goal coordinate (the distance between them will be 0). This can be inconvenient if the target is a hooked object, say, a planet in space. In this case, set this parameter equal to the sum of the radius of the visible part of the agent and the radius of the planet. Then the agent will stop when it reaches the surface of the planet.

Option Property name in Nav3DAgentConfig Type Value range
Max rotation in degrees per fixed update tick
MaxAgentDegreesRotationPerTick
float
>=0

The maximum number of degrees that the agent can rotate when performing a rotation in the direction of movement.
During the movement, the agent turns towards the velocity vector. If the velocity vector changes dramatically during movement, then the agent’s turn may look sharp. To make it smoother, set this parameter not too high.

Option Property name in Nav3DAgentConfig Type Value range
Rotation vector lerp factor
RotationVectorLerpFactor
float
(0 - 1)

In order to make the rotation of an agent even more smoother, when computing the rotation vector the frame rotation vector and the value of rotation vector for a few last frames are used.

Decreasing the parameter makes the rotation smoother, increasing it makes it sharper.

Velocity blending

When using global pathfinding and local avoidance, the agent moves using three velocity vectors:

  1. The velocity vector along the path.
  2. The velocity vector of avoidance from nearest agents.
  3. Obstacle avoidance velocity vector.

The agent blends these three velocities in different proportions and uses the resulting vector for movement. In order to tell the agent in what proportion to mix the speeds, we have introduced weights, the values ​​of which you can adjust.

Not all three velocities can be blended in all situations. For example, there may be no obstacles near the agent, then only the velocity of following the path and the velocity of the nearest agents avoidance will be mixed.

This way you can tell the agent how significant each rate should be when getting the resulting one. If it is preferable to follow the path, then the first weight can be made much larger than the last two. If it is imperative to perform local evasion maneuvers, then the weight of the velocity along the trajectory should be made much smaller than the weight of the evasion speeds.

Below are explanations of the weight parameters. Note that separate parameters are used for each situation.

All weights are floating and must be greater than 0.

The corresponding property names in Nav3DAgentConfig are:

  • PathVelocityWeight
  • PathVelocityWeight1
  • PathVelocityWeight2
  • AgentsAvoidanceVelocityWeight
  • AgentsAvoidanceVelocityWeight1
  • AgentsAvoidanceVelocityWeight2
  • ObstacleAvoidanceVelocityWeight
  • ObstacleAvoidanceVelocityWeight1
  • ObstacleAvoidanceVelocityWeight2

Debug

Option Property name in Nav3DAgentConfig Type Value range
Use log
UseLog
bool
true, false

Whether it is necessary to log agent work processes.

Option Property name in Nav3DAgentConfig Type Value range
Log records count
LogSize
int
>0

Agent log size.

28.1 Creating and configuring a config via code

All Nav3DAgentConfig parameters can be configured through the code as well.

To do this, you should create a Nav3DAgentConfig instance, set correct parameter values, and then apply the instance to the agent.

  • It is suggested to use Nav3DAgentConfig.DefaultConfig to create a new instance.
  • There is a Copy() method to get a copy of the instance.
  • To apply config to the agent it is needed to use the Nav3DAgent.SetConfig(Nav3DAgentConfig _Config) method.

Below is an example of creating a Nav3DAgentConfig instance and applying it to an agent.

				
					void ConfigureAgentConfig()
{
   Nav3DAgent myAgent = GetComponent<Nav3DAgent>();

   //create Nav3DAgentConfig instance with default parameters
   Nav3DAgentConfig myConfig = Nav3DAgentConfig.DefaultConfig;

   //set the parameters you want
   myConfig.Radius = 1.2f;
   myConfig.MotionNavigationType = MotionNavigationType.LOCAL;

   //apply config to agent
   myAgent.SetConfig(myConfig.Copy());
}


29. Nav3DAgent: Methods

As mentioned above, you should use the Nav3DAgent script as a component for your game object and access it via GetComponent() .

The following public methods have been implemented to operate with Nav3DAgent:

  • Applies the description for your agent.
				
					public void SetConfig(Nav3DAgentConfig _Config)
				
			
  • Begins agent movement to the target point.
				
					public void MoveTo(
Vector3                  _Point,
Action                   _OnReach           = null,
Action<PathfindingError> _OnPathfindingFail = null,
float?                   _ReachDistance     = null)


Parameters:

    • Vector3 _Point – target point.
    • Action _OnReach – a callback that invokes on target point has reached.
    • Action<PathfindingError> _OnPathfindingFail – pathfinding failure callback.
    • float? _ReachDistance – target point reach distance.
  • Starts agent movement through the set of points. Pathfinding performs sequentially from each point to the next one, therefore the resulting path passes through all given goal points
				
					public void MoveToPoints(
Vector3[]                _Points,
bool                     _Loop                  = false,
bool                     _StartFromClosest      = false,
bool                     _SkipUnpassableTargets = false,
float?                   _ReachDistance         = null,
Action<Vector3>  _OnTargetPointPassed           = null,
Action                   _OnFinished            = null,
Action<PathfindingError> _OnPathfindingFail     = null)


Parameters:

  • Vector3[] _Points – a target points.
  • bool _Loop – whether loop movement through the points. If true, then the agent will move through the points infinitely, going to the first one every time he reaches the last one.
  • bool_StartFromClosest – whether to start movement from the nearest point, and not from the first one.
  • bool_SkipUnpassableTargets – whether any point to which pathfinding was failed will be skipped. If option is disabled, the pathfinding failure for any pair of points will cause pathfinding to be aborted and _OnFail callback to be invoked.
  • float? _ReachDistance – distance to reach any target point.
  • Action<Vector3> _OnTargetPointPassed – a callback that invokes when any of the target points are passed.
  • Action _OnFinished – a callback that invokes when the last target is reached. This callback will never invoke if _Loop = true.
  • Action<PathfindingError> _OnPathfindingFail – pathfinding failure callback.
  • Starts the following of the transform movable target.

				
					public void FollowTarget(
Transform                _Target,
bool                     _FollowContinuously,
float                    _TargetOffsetUpdate,
float                    _TargetReachDistance   = 0,
Action                   _OnReach               = null,
Action                   _OnFail                = null,
Action<PathfindingError> _OnPathfindingFail     = null)


Parameters:

    • Transform _Target – a target transform to follow.
    • bool _FollowContinuously – whether to follow the target infinitely. If true, the agent will never finish following and never call _OnReach. When the target is reached the agent will merely wait until it continues the movement.
    • float _TargetOffsetUpdate – minimum target position delta that causes path re-search.
    • float _TargetReachDistance – distance to target transform required to finish following and invoke _OnReach.
    • Action _OnReach – on target reach callback.
    • Action _OnFail – callback that invokes if the target was destroyed or switched to inactive condition at the scene.
    • Action<PathfindingError> _OnPathfindingFail – pathfinding failure callback.
  • Stops any previous command (MoveTo, MoveToPoints, FollowTarget).
				
					public void Stop()
				
			
  • Returns agents array within radius _Radius that satisfy the given predicate _Predicate.
				
					public Nav3DAgent[] GetAgentsInRadius(float _Radius, Predicate<Nav3DAgent> _Predicate = null)


Examples of using Nav3DAgent can be found in the demo scenes located in Nav3D/Demo.

30. Nav3DAgent: Debug

The Nav3DAgent has an inspector that provides several useful functions to help with debugging and give a better understanding of the interaction of objects in the game scene.

30.1 Debug drawing

In this section, you can visualize the agent and his nearest environment. This should be done with Gizmos enabled on the game scene:

1.Visualization of the agent radius.

2. Visualization of normalized agent velocities.

Yellow – the path following velocity vector (the direction vector from the agent position to the next target point on the path).

Green – local avoidance vector.

Blue – the blended motion vector (a mixture of the path following vector and the local avoidance vector)

3. Visualization of the path the agent follows.

4. Visualization of nearby agents that can be taken into account when performing local avoidance.

When performing local avoidance, depending on the setting of the allowed number of agents under consideration (in the agent description), the n closest agents will be taken from all nearby agents.

5. Visualization of nearby obstacle triangles that are taken into account when performing local avoidance at the moment.

6. All enabled.

30.2 Agent log

Here you can copy the contents of the agent log to the clipboard by clicking the button if logging is enabled in the agent description.

31. Nav3DEvader

There is also a separate controller, whose behavior consists of just avoiding nearest agents and static obstacles, if they collide with it.

Its behavior looks quite interesting. The demo can be found in the Nav3D/Demo/EvadersCrowd folder.

Its inspector has following settings:

  • Radius – the radius for which collisions with other entities are checked.
  • Max Speed – the max. allowed speed for performing avoidance.
  • Speed Decay Factor – the speed decay factor after completing the avoidance maneuver. The higher the value, the faster Nav3DEvader will stop after avoiding a collision. The valid range of the value is (0-1).

32. Nav3DSphereShell

Represents a spherical shell that is perceived by other agents as an object to avoid. Nav3DSphereShell can be moved externally. Nav3DAgents and Nav3DEvaders will avoid collisions with it.

The behavior of Nav3DSphereShell is shown in the demo Nav3D/Demo/SphereShellDemo.

You can adjust the radius of the sphere in the Nav3DSphereShell inspector:

Nav3DSphereShell

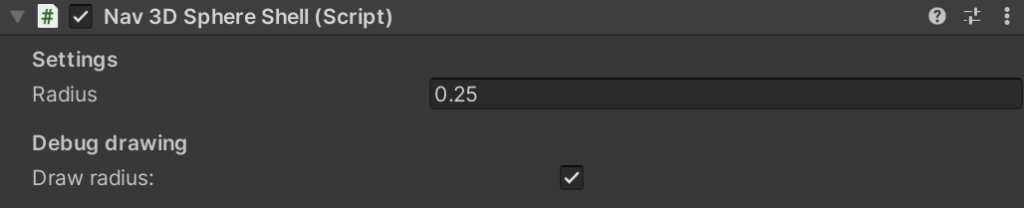
Represents a spherical shell that is perceived by other agents as an object to a...

Nav3DEvader

There is also a separate controller, whose behavior consists of just avoiding ne...

Nav3DAgentManager

This class implements several methods to get a list of all Nav3DAgents located i...

Nav3DPathTester

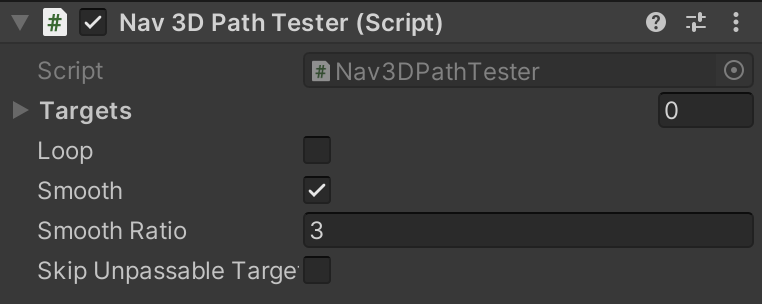
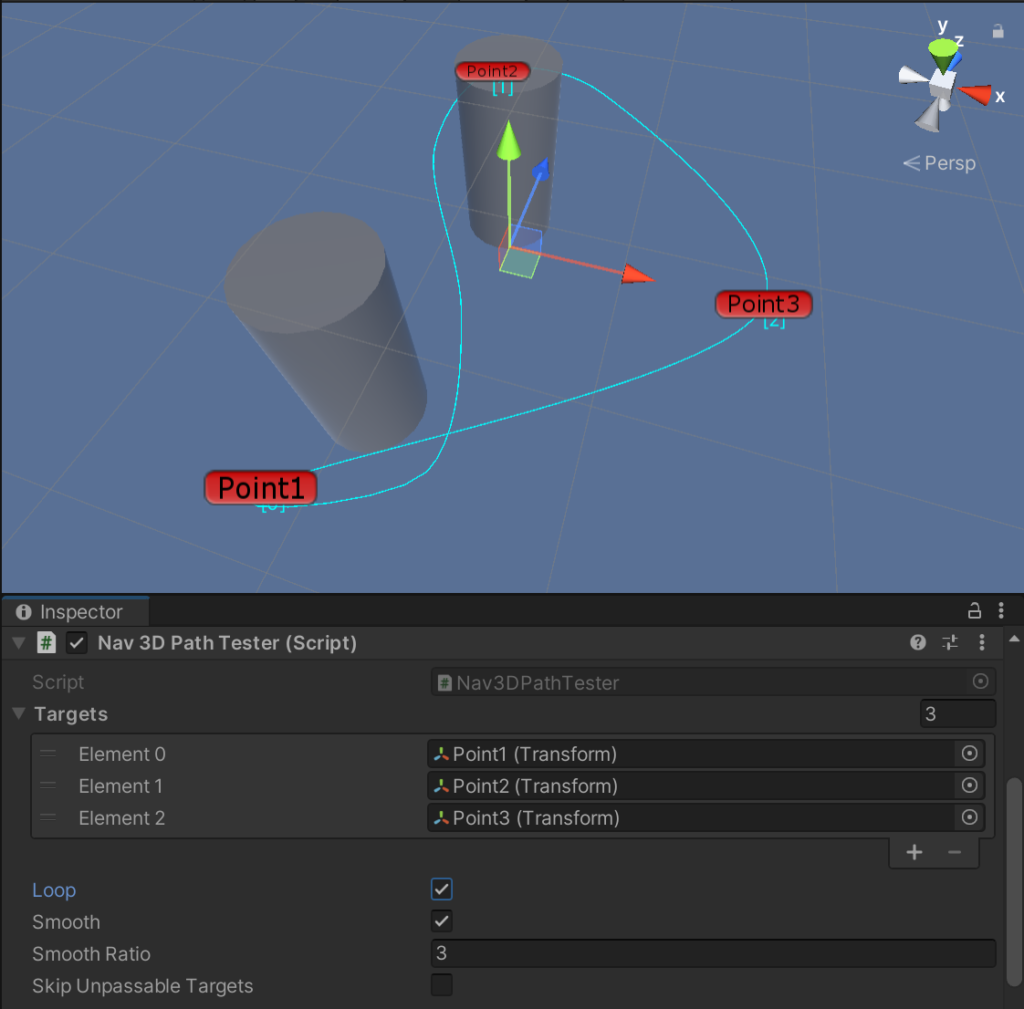
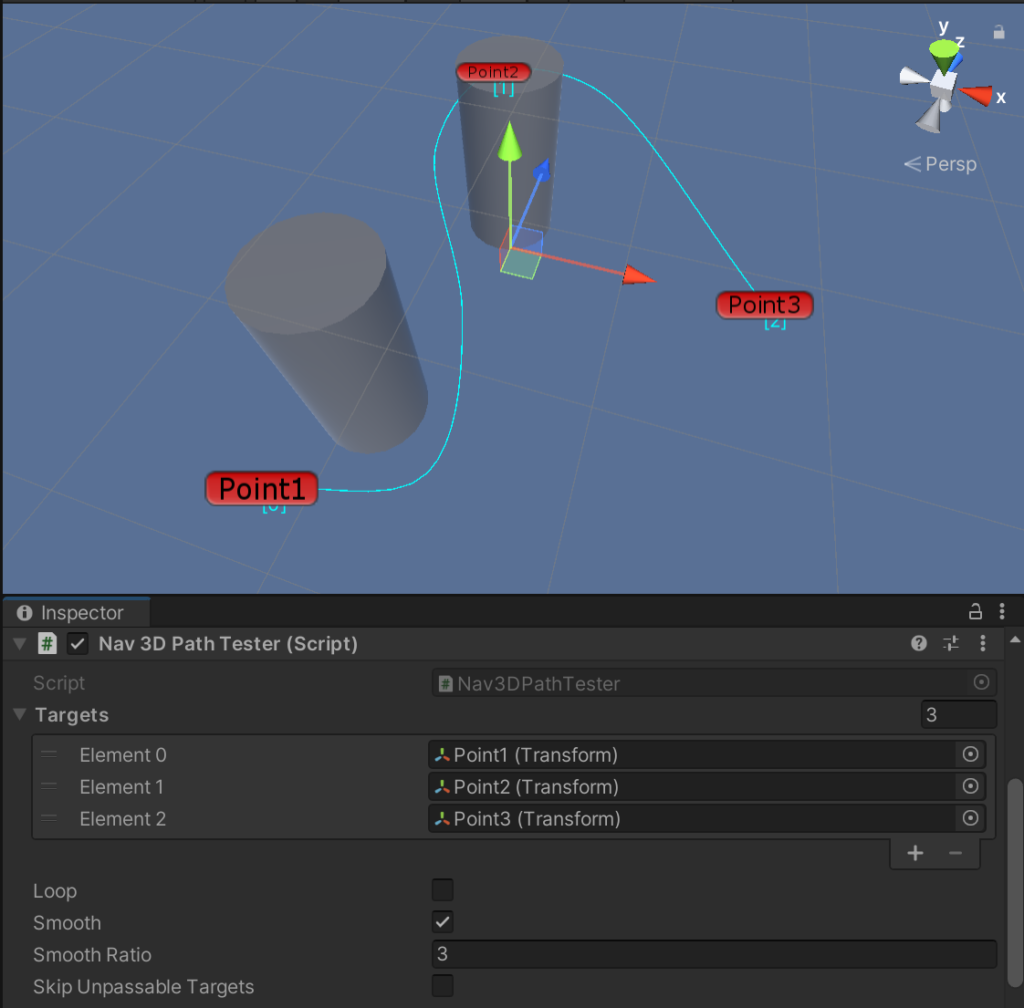
We implemented a useful component (Nav3DPathTester), which can be used while bui...

PathfindingResult

Contains the pathfinding data and time statistics. Time statistics: public TimeS...

Nav3DPath: Events

For the convenience of notification when the pathfinding finished, the following...

Agent log

Here you can copy the contents of the agent log to the clipboard by clicking the...

Debug drawing

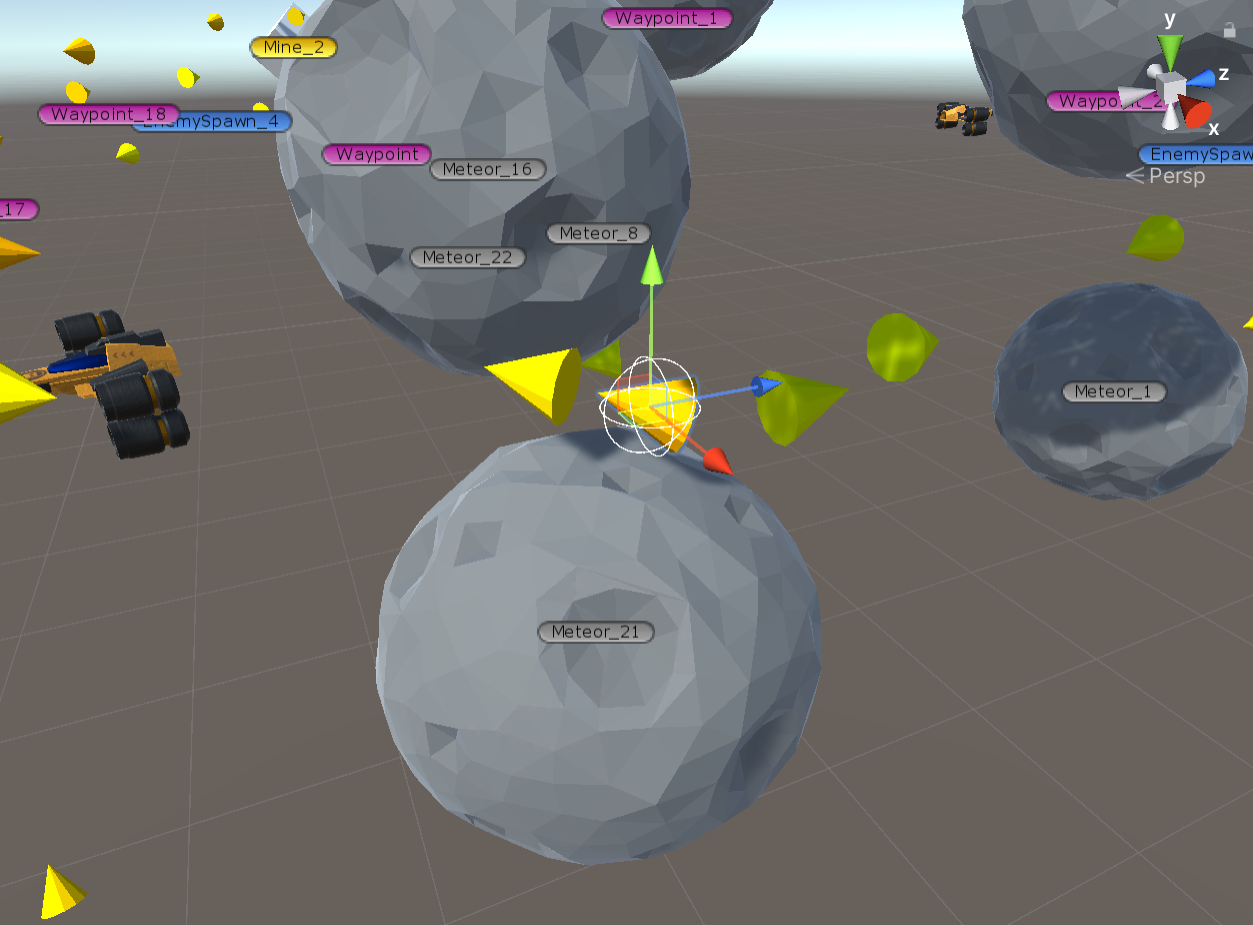
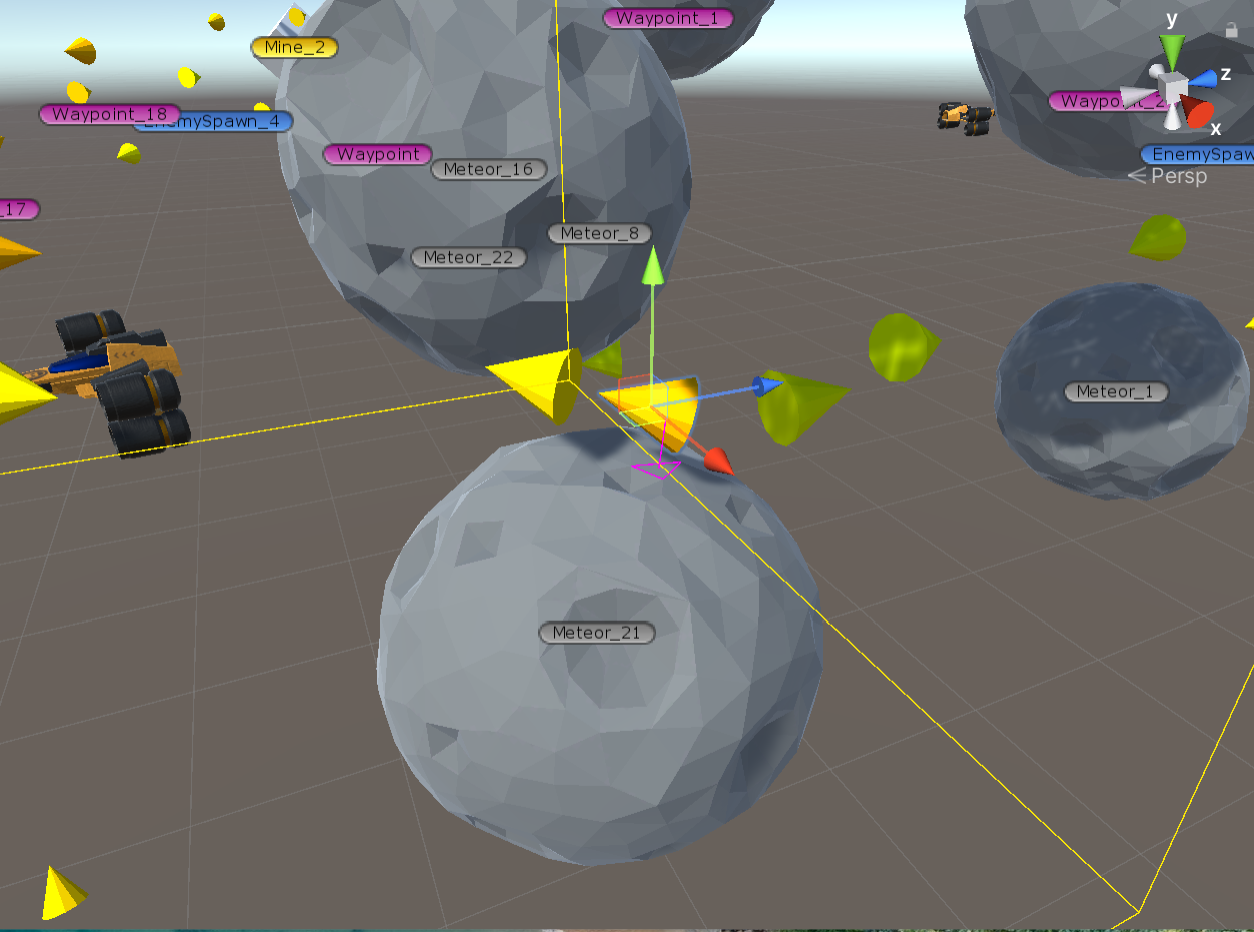
In this section, you can visualize the agent and his nearest environment. This s...

Creating and configuring a config via code

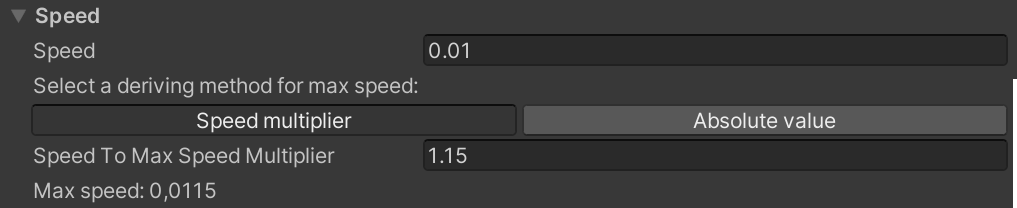
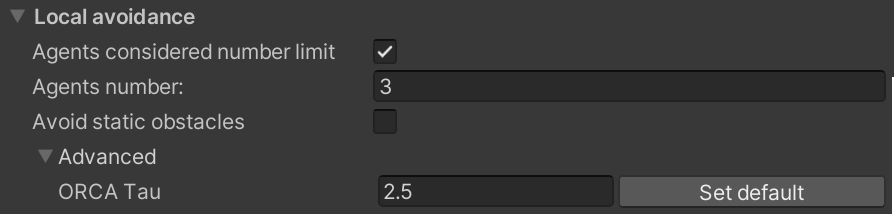
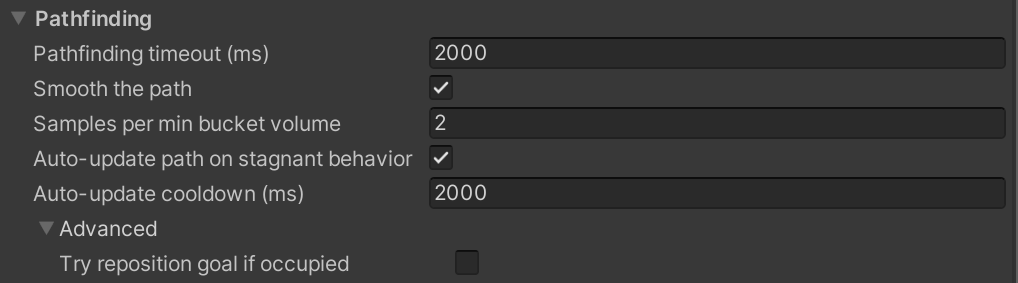
All Nav3DAgentConfig parameters can be configured through the code as well. To ...

Nav3DManager

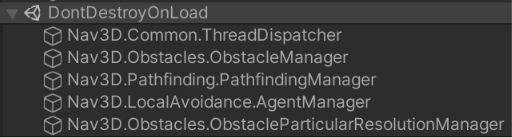
Nav3DManager is a helper static class. Can be useful for checking whether Nav3D ...

Nav3DInitializer

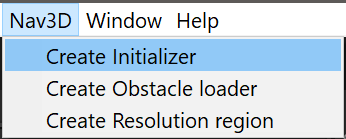
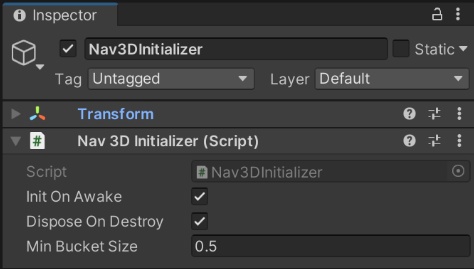
To use Nav3D in playmode, you need to initialize it. The Nav3DInitializer compon...

Nav3DObstacleLoader

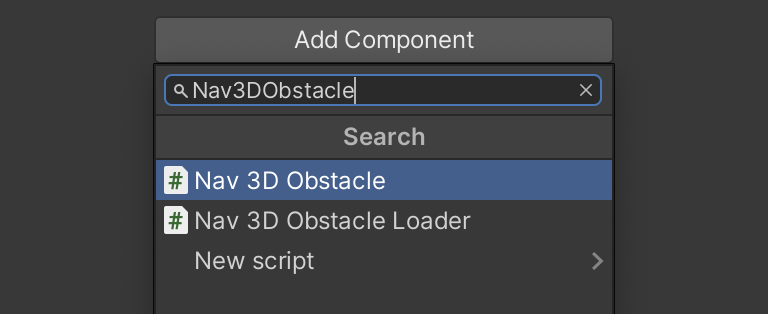
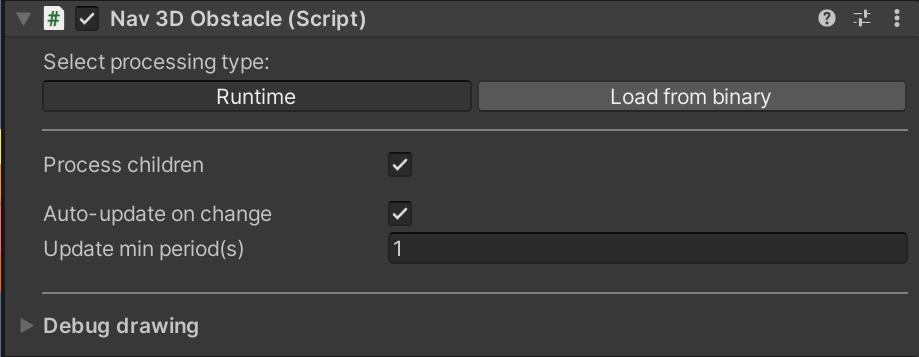
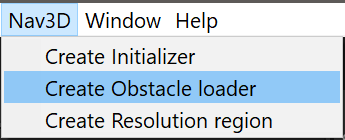
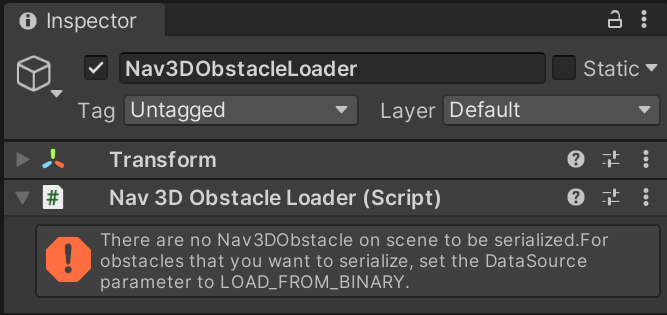
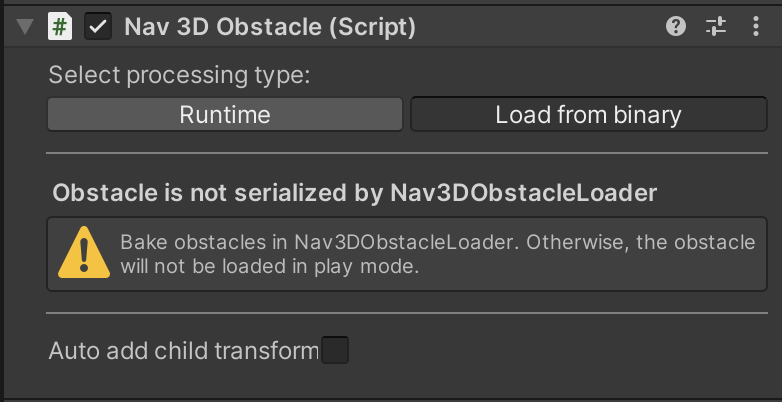
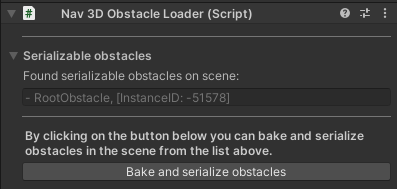
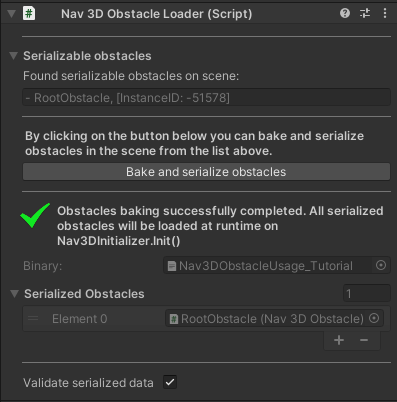
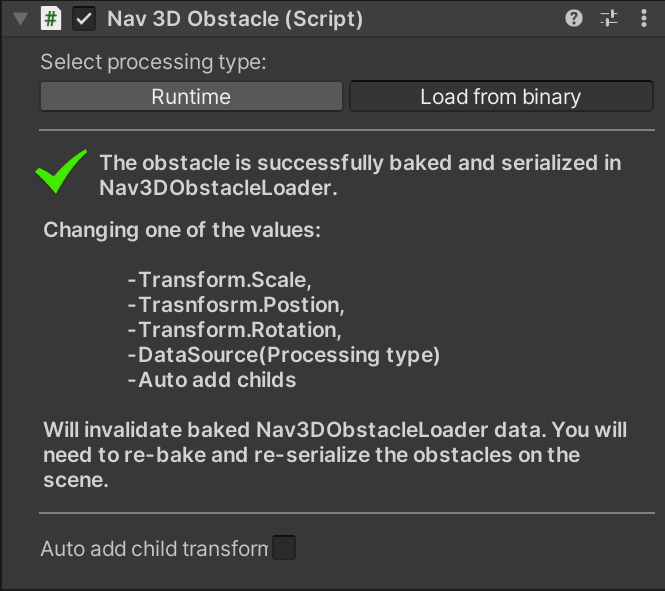
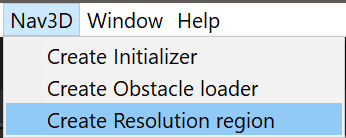
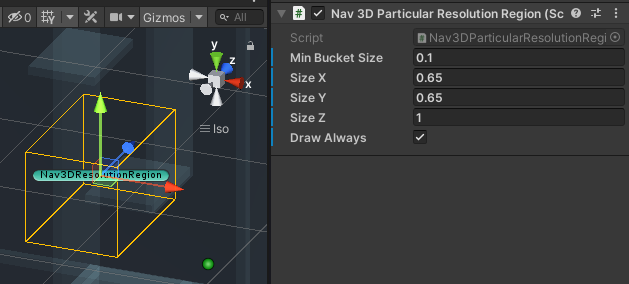
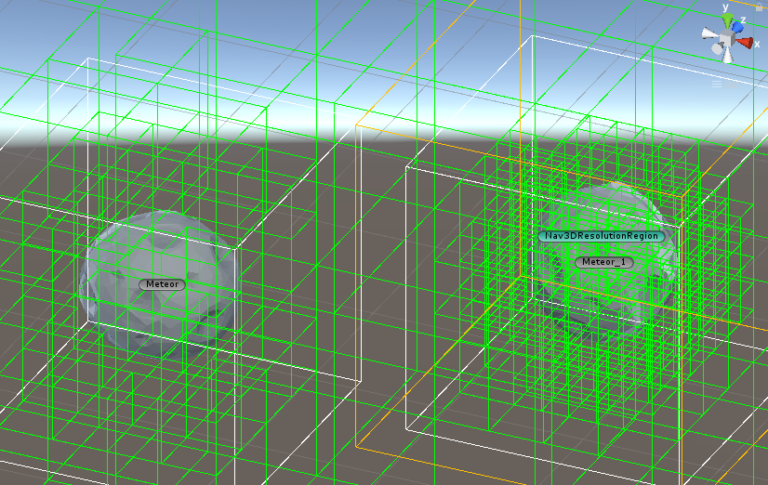
To use the possibility of pre-baking obstacles on the scene in editor mode and t...

Chat Icon Close Icon
en_USEnglish